How to Build Adirondack-Style Chairs
by: Dale Cox
These lawn chairs are perfect for a porch or yard and are very easy to make with basically three components required to construct one chair: the back, the seat, and the arms/legs. The design is reminiscent of Adirondack chairs but with less of a slope to the seat and a shorter back.
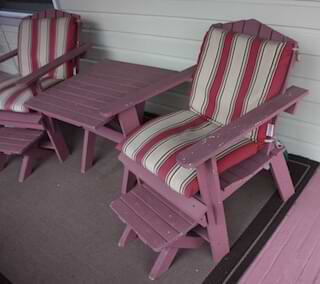
To build a chair like this requires just five 1x3 furring strips, three 1x4 planks, and a short piece of 2x3 ripped to make the back support.
Construction is pretty simple with most of the pieces to each component requiring a simple cross cut. The contoured seat calls for a bit of jigsaw work as do the two arm braces but the patterns for both are super simple. The most complicated jigsaw work is need to rip the back support at 15º along the length but even that is an easy task using the builtin saw fence as a guide.
Chair Cut List
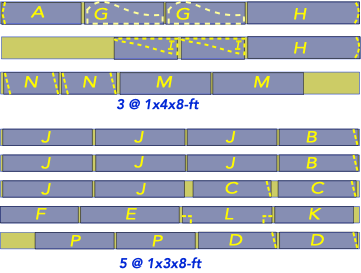
The cut list for building one of these chairs is illustrated here and includes each labeled part laid out on the three 1x4's and five 1x3's used.
Parts "A" through "F" make up the chair back; Part "G" forms the seat contour; Parts "H" and "I" make up the arm assembly; Parts "J" through "L" form the seat bottom; Parts "M" and "N" form the front and rear legs, and part "P" provides rails to stabilize and join the leg sets together. Parts "G" and "I" will require a pattern outlined on the wood to cut out the form for the seat and arm brace.
#1 - Build the Chair Back
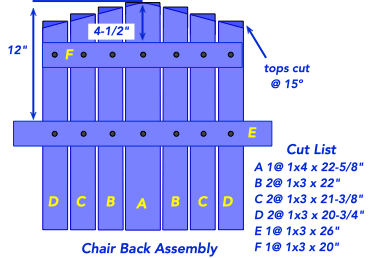
Start by cutting all the parts for the chair back following the diagram here. Using either a miter saw or a compound miter saw set to the require angles will make it easy to get accurate cuts both squared and mitered.
Part "A", a 1x4, is cut at 15º from each side to form a blunted point at the top of the center back slat. The remaining slats are 1x3's, each cut at 15º across one end and joined to the two horizontal rails, "E" and "F", so that they form a taper from each side up to the center point. The rails are cut straight across their ends.
It may be easier to cut the full length of each 1x3 back slat first and then stack the like parts to trim the ends at 15º as required. If you prefer, you can cut the tapered ends without the extra step of cutting them straight first but for accuracy, stacking and trimming the ends together at 15º may produce a better result.
Lay out the parts as in the diagram with the top rail, "F", set 4-1/2" from the top point on part "A" and the bottom rail, "E", set 12" from the same point. Make sure everything is square and joint the slats to the rails using 1" screws driven from the back through "E" and "F" and into the each slat so no screws show from the front of the chair. Countersink the heads of the screws to be sure they penetrate deep enough into the slats to secure them without going all the way through.
#2 - Build the Chair Seat
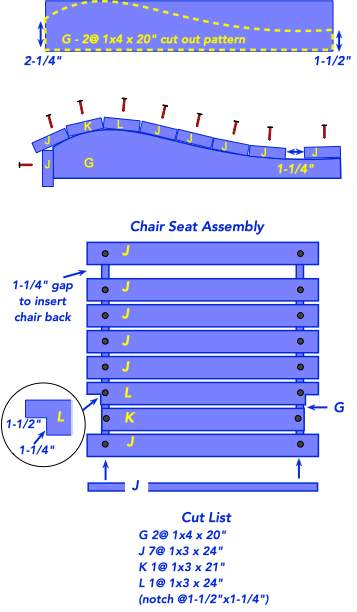
To make the seat comfortable for sitting it should be contoured by cutting the form for part "G" using the diagram here. You can make a paper pattern first using the measurements illustrated or you can just draw the form directly onto the wood.
After the form is cut out, the seat slats "J" through "L" are fastened to it using 1-1/2" screws, countersinking the heads so they don't protrude and catch onto clothing, etc. when sitting down. Cut the seat slats a shown in the cut list, paying attention to parts "K" and "L" as they are different from part "J".
Attach the slats to part "G" starting at the back, setting the first one flush with the back end and overhanging each side by 1-1/2 inches. Place the next slat moving toward the front of the seat leaving a 1-1/4 inches gap between these first two slats.
Install the next 3 "J" slats so they are butted against one another and overhang the sides evenly. Then install part "L" with the notch facing the front of the chair and the ends overhang flush with "J". Install part "K" next butting it against "L" and setting the ends flush with the sides of "G". Install the remaining parts "J" until reaching the front where the last one is attached to the front of "G" and the slat above overlaps it a bit.
#3 - Join the Components
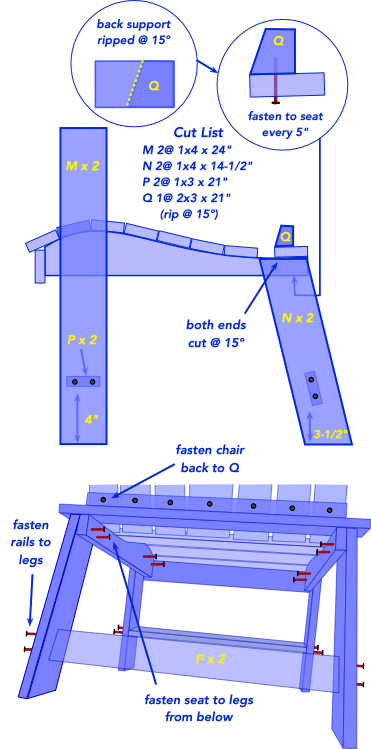
With the seat and back assemblies completed, the legs, arms and supporting pieces can be cut and all the chair parts joined together to complete the project.
Cut the legs, parts "M" and "N", as shown in the diagrams with "N" cut at 15º opposing angles on both ends. Also cut the 1x3 rails, part "P", for joining the legs together under the seat.
Cut part "Q", a 2x3, and rip it at 15º down the middle. To make cutting this part easier, you can start with a 2x3 longer than the finished length. Rip it to a bit longer than the 21 inches required using a jigsaw set a 15º and then cut it to length.
With all the part cut, the legs, seat and back can be joined together. Start by attaching "Q" to the front of the last slat on the back of the seat assembly using 2" countersunk screws. Set the rear legs butted against the back slat on the seat and flush with the back of "G". Attach them using 1-1/4" countersunk screws driven from under the seat assembly. Take care that the screws don't go all the way through and protrude from the other side of the leg.
Set the front legs into the notch created by slats "K" and "L" and adjust the height so part "G" is level before attaching them with 1-1/4" countersunk screws driven from under the seat. Take care that the screws don't go all the way through and protrude from the other side of the leg.
Set the two parts "P" into place as shown in the diagram and attach them between each set of legs using 2" countersunk screws.
Set the back assembly into the gap between the seat slats and push it down until it rests on the top of "G". Lean the back against part "Q" and drive 2" countersunk screws through the back of "Q" and into the center of each back slat. Take care that the screws don't go all the way through the slats and protrude from the seat back.
#4 - Add the Arms
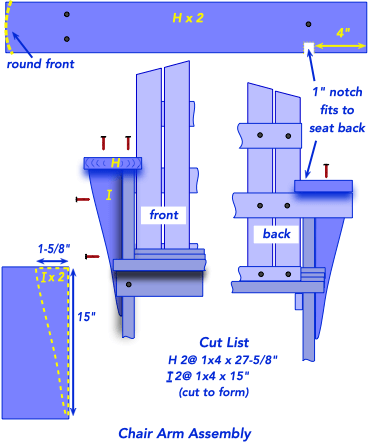
Cut the two arm pieces "H" and use a jigsaw to round the front of each one. Also cut a notch as shown in the diagram on the inside of each arm 4 inches from the back. With a jigsaw, cut two parts "I" from 1x4 boards using the pattern shown.
Sand all rough edges and from the outer edge, pre-drill a 1"-deep hole a couple inches from the top and a 1/4"-deep hole a couple inches from the bottom using a 3/8" forstner bit. Use these holes to drive a 1-1/4" screws into the front leg to attach "I" so it's centered on the leg and flush with the top. Take care not to drive the screws all the way through the leg and then cap the holes with 3/8" wood plugs for a finished look.
Set arm "H" into place resting on the front leg assemble and push the notch snuggly against the back to brace it in place. Drill shallow 3/8" holes with the forstner bit and drive two screws through the arm and into the front leg and brace. At the back, drill a hole centered and into the back rail "E" next to the notch.
 Building a Backyard Arbor