How to Repair Loose Lath Plaster
by: Dale Cox
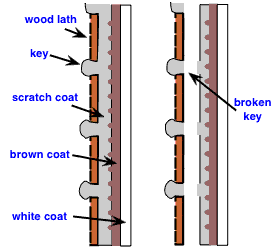
Loose plaster is often a problem in walls and especially ceilings with wood lath. This type of plaster will usually be found in houses built before the 1920's. After that time, gypsum board was developed for use as lathing material which greatly improved on plaster durability.
Older wood-lath plaster can become loose over many years, as the nails in the wood are corroded by the lime in the scratch coat. The result is loose lath strips that move and vibrate due to normal foot traffic, etc. These vibrations cause the plaster key to break free from the wood and the surface of the plaster to crack or crumble as it moves.
To stabilize the plaster and prevent further cracking, the techniques on this page can be used to reattach the wood lath to the framing and stabilize the plaster coat by reattaching it to the lathing. Once the wall is stabilized, the cracks in the plaster surface can then be repaired as illustrated here. The methods on this page will work nicely in cases where the plaster key is still generally intact but extremely loose walls and ceilings may be impossible to repair using this method. In those cases it is advisable to cover it with new drywall instead.
What You'll Need
- Drill/Driver
- 1/2" Masonry Drill Bit
- 2 or 3 inch Drywall Screws
- Chalked String
- Putty Knife
- Setting-type Joint Compound
- Drywall Joint Knife
- Mud Pan
- Sandpaper
#1 - Reattach the Wood Lath
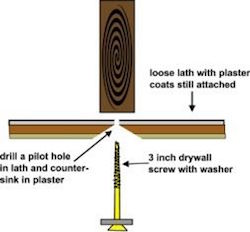
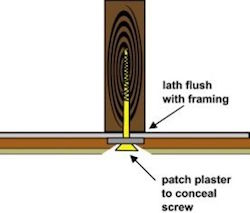
This method can be used to reattach the wood lath strips to the wall or ceiling framing. This will work if the plaster is still mostly intact.
Start by locating the lath and the studs or joists behind the loose plaster. Use a drill and an eighth inch masonry bit to bore holes at one inch intervals along the surface until you locate the framing. These holes should be bored through the gap between the lath strips.
Once you find a stud or joist, mark the location and bore a one eighth inch pilot hole through the lath strips and into the framing behind. Do this at each stud or joist along each loose lath strip.
Next bore ½ inch countersunk holes in the plaster coats at each pilot hole. The portland cement in the plaster will dull drill bits in short order so use masonry bits for countersinking.
On walls it may be possible to press the plaster back in place using a sheet of plywood and a 2x4 wedged against the floor. This may help minimize creating new cracks when the lath moves back in place.
In any case, when you have you pilot holes ready, use 2 to 3 inch drywall or wood screws and ½ inch washers to reattach the wood lath to the framing as illustrated here. Tighten the screws down slowly to avoid sudden movement that could further crack the plaster coats. Repair the holes using the repair methods on the Drywall Repair Nail Pop page. Repair cracks using this crack repair process.
#2 - Perforate the Plaster Coat
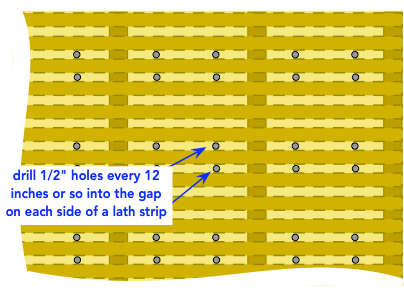
If the wall surface is still moving easily after reattaching the lath strips, the plaster coat will need to be reattached to the lath. This will require creating a new key to replace the broken one. This is an elaborate process and may not be worth the effort if the entire surfaces has broken free of the lath. If however, there's only minimal movement in the surface, this process can be a lasting solution to prevent future cracking in old plaster.
Use setting-type joint compound, also called mud for this. In this process the new mud is "injected" at regular intervals across the wall to restore the plaster key. Start by marking the first gap between the lath strips at one corner of a wall. Mark both sides of the wall and use a chalked string to snap a chalk line between the corresponding marks.
Use a masonry drill bit to bore ½ inch holes in the plaster between the lath strips at 8-12 intervals. Check to be sure that the lath is visible in the holes and that you aren't boring into the strips themselves.
Injection points can be spaced widely across the surface but they should be at least every 12 inches or so to ensure enough of the key is restored to stabilize the entire plaster surface.
#3 - Restore the Plaster Key
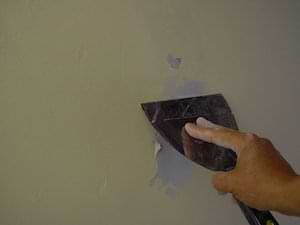
Mix setting-type joint compound and press the mud into each hole using a drywall joint knife. Fill the holes until mud over flows. Scrape off the excess with an upward stroke of the knife blade before moving to the next hole.
Let the mud set for about an hour or until the wall feels solid when pressing against it. Use the joint knife to scrape any excess mud off the wall and sand to smooth. Mix and apply a skim coat of mud over each patch to finish the repair.
 Three Coat Plaster Repair