How to Build a Fence
by: Dale Cox

Most yard and garden fences consist of 8ft sections join together at 4x4 posts. You can build your own fence sections like the picket fence design at this link, or you can buy prefab fence sections at a home store or lumberyard. You'll need to measure accurately to set posts for these sections. The fence rails must meet in the middle of the posts so both sections can be fastened securely with screws or nails. This requires posts set perfectly perpendicular and at a consistent 8ft distance from each other.
Be sure to use pressure treated wood intended for fence posts whenever possible. If you're putting in a vegetable garden, pressure treated wood is not a good choice because of the chemicals that can leach into the soil. For most other situations however, pressure treated wood is the best choice because it will not be affected by the ground moisture and insects that can rot untreated wood in a very short time.
To minimize the effects of moisture on fence posts, you can use gravel to set them. Laying a couple inches of gravel at the bottom of a post hole and then backfilling around the post with gravel will provide drainage that will help prevent water from rotting the wood.
Tools Required to Build a Fence

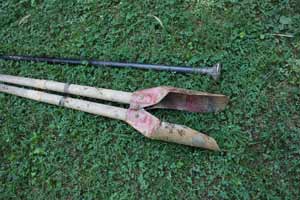
You'll need a couple of special tools to build a fence. A post hole digger will be required to make holes for the posts. There are a couple different grades of post hole diggers available at home stores. The basic version is usually quite sufficient for most fencing jobs around the house but if you have very rocky soil or a lot of clay to deal with, a heavy duty post hole digger may be a better choice.
To set the posts firmly in the ground, you'll also need a tamping rod. A tamping rod is needed to pack soil and rocks around the posts to set them firmly in the ground so they don't move when pushing on them. It may be possible to improvise a tamping rod but because of the force needed, you really need something made for this purpose. A specially made tamping rod is a very heavy 6 foot steel bar with a blunted form on one end. The weight of the steel and the blunted end facilitate effective compressing of earth and rock around the post with minimal effort.
#1 - Lay Out the Fence
Lay out your fence starting with one entire side, from corner to corner. After you've set all the posts along one side, move to the next side using the last corner post as your starting point. Start the layout by driving short stakes into the ground at the first two corners and stretching a string tightly between them to line up the post holes. Set the stakes back from the corners by a few feet so you have room to dig the holes and set the corner posts without disturbing the stakes or the string.
Set the string line to trace the outer edge of the planned fence line exactly so when you set the posts in the ground, the string will just touch them along the outer face. You'll have to be careful while digging the holes not to hit the string and break it or move the location. If you accidentally disturb the string, restring it right away to keep an accurate fence line.
From the first corner, measure along the string 8ft and drive a stake at this mark exactly. When measuring keep in mind that at corners, the fence sections will reach all the way to the outer edge of the post. Start measuring from this outer edge for the first middle post and then measure from the center on all the remaining posts. At the other end, measure to the outer edge of the corner post again. Be sure to keep the stakes accurately placed at every 8ft mark to ensure your post holes will be accurately placed.
#2 - Dig the Post Holes
Most 4x4 posts are 8ft long and the post holes are typically 2-1/2 to 3 feet deep. This sets the top of the posts at 5 to 5.5 feet. If your fence requires the post be set to a predetermined height, be sure the depth of the holes allows for this. If you will be using gravel at the bottom of the hole for drainage, be sure you factor this into your calculation for predetermined post height as well.
When you dig a post hole, pull the stake marker out and drive it into the ground again, at the same point but a foot or so toward the interior of the fenced area. Keep an eye on the stake as you dig to maintain an accurate location. As you dig the holes, remember that the string will be a guide to setting the posts plumb. You want the string to just touch the outside of a post when it's set so dig the hole wide enough to allow for this.
#3 - Set the Posts
When you set a post in a hole, adjust it so the base is centered at 8ft and aligned with the string so it just touches it but doesn't move it. Use a level held on both sides of the post to make it plumb and check that the top is centered at 8ft. Hold the post in position and start backfilling the hole. You will have to check with the level and measuring tape several times as you fill and tamp around the post to be sure it doesn't move off the mark as you work.
Backfill around the post starting with rocks placed on all four sides and then add several inches of dirt on top of them. Tamp the filler down to pack it firmly around the post, check the placement, and if the post is still plumb, add more rocks and dirt.
If the post moves out of alignment, push it back to plumb and add some extra rocks to compensate for the misalignment. Add another layer of rocks and dirt, tamp it down, and check the placement again. It will take 4 or 5 layers like this to finish backfilling the post hole. When it's completely filled, check that the post is firmly set and doesn't move when you push on it. If necessary, add more rocks all around and tamp them down until your post is good and firm.
#4 - Install the Fence Sections
When all the posts are set you can start installing the fence sections. Begin at one corner and attach a section so the ends of the all the rails are flush with the outer corner of the post. Check the other post to be sure the section sits at the mid-point evenly from top to bottom. Lift the section slightly so it doesn't make ground contact and use a level set on one of the rails to set it straight. Attach it to both posts using one 3" deck screw or 16d galvanized nail through the end of each rail.
Fencing on a Slope
If your yard is sloped, you'll have to stagger the sections like steps to install a fence. Using this method, the top rail of one sections will be higher on the post than its neighbor. Take this into consideration when you set the posts so sufficient space is provided for the higher fence section.