How to Touch Up Wall Paint
by: Dale Cox

Touching up walls and ceilings painted long ago can sometimes create a more unsightly finish than the old paint itself. To avoid this problem, it's important to use the original paint, and only the original paint, for retouching small areas in the middle of walls and ceilings.
It's also important to realize that any white paint will not match any white paint. There are hundreds of shades of white available from dozens of manufacturers using completely different formulas, making it impossible that any of these colors will match each other. And what about different finishes like semi-gloss, eggshell, high-gloss, oil-based paints, etc.? Can these finishes be retouched successfully? Unfortunately, as a general rule, only flat paint can be retouched without "flashing" in the new finish. But all is not lost. Any old paint finish can be improved using the paint from break-to-break technique described below to avoid a flashing problem.
What is Flashing?
Flashing is a term used by professionals to describe the obvious difference in a finish that will often occur when retouching old or shiny paints. Flashing is most obvious when viewing a surface from the side. Look down a wall while standing at one corner of a room, you will see all the little imperfections in the surface as light is reflected off of it. Any difference in the overall finish of the surface is called flashing.
What Causes Flashing
Flashing will almost always occur when using anything other than the original paint for touch-up on small areas of a wall surface. It will also occur when you try to touch-up a shiny finish as the sheen of the new paint fails to blend with the old. Flashing will also develop when a shiny coating is applied over bare wall repair patches without priming them first. To avoid joint compound flashing like this, mud and spackling paste must always be primed using a flat finish before semi-gloss, eggshell or oil-based paint is used.
How to Fix Flashing
- If you suspect that the irregular appearance of your walls is caused by failure to prime joint compound, re-coat the patches with flat paint or primer, let it dry, and touch up the paint as described below.
- When doing touch-ups, always use the original paint from the original can to minimize the chance of flashing. Trying to touch-up spots on your wall or ceiling using anything other than the original can of paint will most often cause flashing. An exception to this is stock colors from the same manufacturer. These are mixed at the factory and a new batch will usually match an existing color.
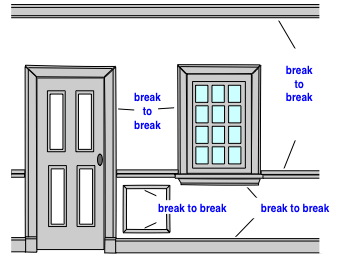
- When you try to touch up and it causes a flashing problem, the best solution is to do a whole wall or ceiling section from one break to another. This "Paint from Break-to-Break" method will diminish the noticeable difference in the new finish when the color isn't exactly right.
Identifying Paint Breaks on a Wall

A break in a wall is usually at the ceiling and corners but can also occur when trim molding stretches from one wall corner to another, from floor to ceiling or some other feature of the room blocks off a section of wall or ceiling space. When a wall is broken into isolated sections like this, it can be repainted with a closely matching color and the minor difference will not be noticeable in the overall appearance of the room. Corners work well as break points because the two wall surfaces reflect light differently, making it hard to see small variations in the finish. Distance will also make a color blend better so touch-up on one side of a room will appear to match the color on the other side of the room even if it's slightly off.
Choosing Paint for Touching Up
If possible, always use the original paint leftover from the original job. If the original paint is not available and it's a stock color −a premixed color made at the factory, not mixed at the store− then a new can of the same color will most often work as long as the wall paint isn't dirty from smoke or some other stains. If you must get a new batch, check the new color for matching before you proceed with touching up the whole room and use the paint from break-to-break method if it's not matching well.
While stock colors are pretty safe, custom mixed colors will usually not match the original paint. The problem is the accuracy with which the color is mixed at your local store. Different people on different mixing machines, or even operating the same machine, will use slightly different amounts of tint. All it takes is a tiny change in the amount of tint to change the color enough that it shows on the old finish. Even computerized machines can produce enough of a difference in the mixed color to cause a mismatch.
What About Shiny Paints
Shiny finishes can be the most difficult to touch up. This includes: eggshell, semi-gloss, high-gloss, and all oil or alkyd-based finishes. Even flat oil and alkyd will flash if you try to touch up in the middle of a wall or ceiling. For all these finishes use the break-to-break method to freshen the finish. Original paint or not, the only way to avoid a flashing problem when using shiny paint is to do a whole wall.
Touching Up Walls and Ceilings
Make sure your paint is mixed well before putting it on your walls. Shake the can for several minutes or stir vigorously just before using it. Apply the new coating using a brush on small areas and a roller on larger spaces. Check to be sure the new paint is blending well with the original finish before doing the whole job.
Do a small area first and wait for it to dry completely, use a hairdryer to speed drying if you're pressed for time. When it is completely dry, examine the finish while looking down the wall. If you can easily see the spot where you applied the new paint, your touch-up job probably won't look very good when you're all done. If you look at the wall face on and you don't really notice the difference, then you can decide if it will be good enough for your purposes. If you find the finish unacceptable, use the break-to-break method described above to fix the problem.
Touching Up Trim Molding

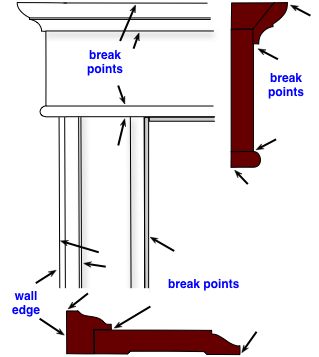
Trim should be treated in the same way as shiny finishes, painting from one break point to another. Break points for trim are the points where two separate pieces of molding come together such as at the corners on door and window casings. Also, where one pieces of molding is laid over another, the joint between the two makes a good break point. The shaped edges of an individual molding profile can also form a break point where the plane of the wood surface changes.
To touch up on a door casing, for instance, do all along one side from the floor or plinth block to where it meets the top of the frame. Don't do the narrow edge of the casing where it meets the wall, just do the face. As long as the new paint is fairly close to the original color and sheen, it will be hard to see the difference between the side and top molding pieces when it dries. At the edge, the touch-up will not be noticeable because it's viewed at a different light angle from the face.
Dealing with Stains
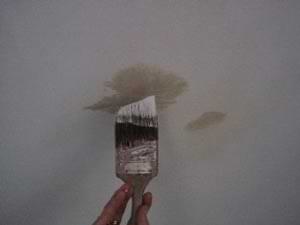
Touching up the paint is one thing but stains present another problem. Some stains will bleed through the new coating if they aren't sealed first. Water, ink, cigarette smoke, and grease stains will all ruin your touch-up job. To avoid this problem, use a sealer to block these stains before applying any finish paint. It may be necessary to apply the touch-up paint from one break to another when treating stains like this. See Repair Tips for Stains and Repair Water Stains for more about dealing with this problem.
Shellac-based sealers and oil-based sealers like Kilz® dry very quickly (about half an hour) and will block almost any stain with the exception of tannin from redwood or cedar. These are not commonly found in new homes but historic building will often have redwood trim that has been painted. When tannin bleeds through the finish, use a water-based sealer like Kilz2® to block the stain and then touch up as described above.