Framing to Add a Ceiling Fan
by: Dale Cox
Check permit requirements before beginning electrical work.
How to read these diagrams.
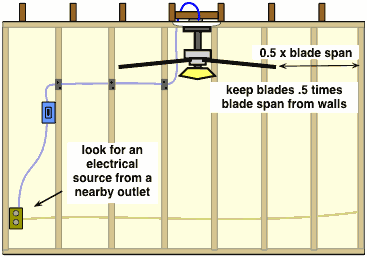
This page describes installing 2x4 framing for a new ceiling fan or light fixture if no outlet box exists in the desired location.
To install this frame, first determine where the fixture will be located. If you're installing a new fan, be sure to place it so the ends of the blades are at least one blade length from all walls. Also, look for a location that will be near an existing electrical source. For instance, if there's a wall receptacle nearby with available power, it can be used to serve a switch that can then serve the new fixture. Check locating an electrical source and fishing cable for more about installing the wiring required for this project.
With Attic Access
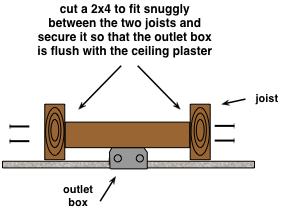
Working in the unfinished attic space above the new fixture location, measure the distance between the two nearest ceiling joists. Cut a 2x4 to this length and attach a new, fan-rated outlet box to the midpoint using deck screws.
With the 2x4 and box assembled, hold them between the joists so the outlet box presses against the back of the ceiling. Trace the outline of the box with a pencil to mark the hole. Remove the assembly and cut a hole along the trace line using a drywall saw for drywall or plasterboard and a reciprocating saw for wood lath plaster.
After cutting the hole, put the 2x4 between the joists again and set it so the outlet box sits flush with the finished ceiling surface. Have a helper hold a board over the outlet hole to support the box and keep it at the proper level while securing it in place with two, 3 inch deck screws through each joist. If needed, metal L-brackets may be added at the corners for more support.
With No Attic Access
If no access is available from above you can work through the outlet hole to install a specially made, adjustable fan support. Using this method, it can be difficult to secure the support and set the outlet box at the proper finished level. An easier way to be sure of proper placement is to use the method here to install a wood frame. The ceiling must be cut to do this, after which the damage can be patched and/or covered with a decorative medallion.
Locate the two joists nearest the new fixture location using a stud finder or tap on the wallboard until the sound indicates the general location of the joists. Use a drill and an eighth inch bit to drill through the plaster where the joists are estimated to be. Drill holes at 1" intervals until you meet resistance and wood from the joist is ejected. Mark the location of each joist with a pencil mark.
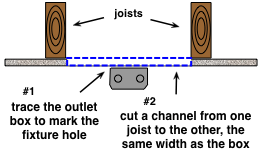
Hold the outlet box against the ceiling about midway between the joists and trace the outline with a pencil. Cut a channel from one joist to the other, the same width as the outlet box. Use a drywall saw to cut gypsum board and a reciprocating saw to cut wood lath plaster.
Build a Support
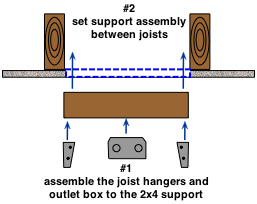
Working through the channel, measure the distance between the joists and cut a 2x4 to this length. Attach a fan-rated outlet box to the midpoint of the 2x4 where you want the fixture to be. Attach a joist hanger to each end of the 2x4, keeping them flush, not protruding past the end of the wood. Butting the 2x4 against a flat surface while assembling can help to keep the bracket set properly. Insert the support assembly between the joists and set it so the outlet box is flush with the ceiling surface.
Attach the Support
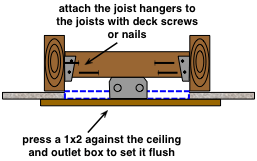
Press a small board against the bottom of the outlet box to hold it flush with the ceiling while attaching the support assembly to the joists. Working through the channel, drive deck screws or nails through the holes in the metal hangers and into the joist. Use four screws on both ends of the support, two on each side of the hangers.
Repair the Ceiling Board
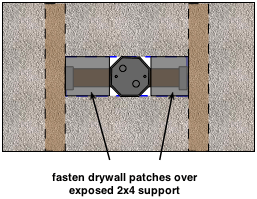
Cut drywall patches to fit the space on each side of the new outlet box and attach them to the 2x4 support with drywall screws. Tape the seams with mess tape and cover the whole thing with joint compound and smooth it out. Apply several coats to build up a smooth finish that can be sanded and painted to touch up.
Install a Ceiling Medallion
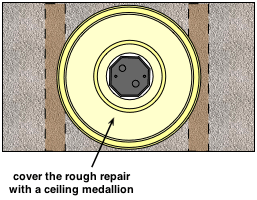
An easier alternative to repairing the damage is to use one coat of mud and then cover the rough repair with a preformed medallion. A plastic medallion can be installed using caulk to stick it to the surface or using the fixture cover plate to hold it in place. You can also get a plaster medallion, these should be installed using setting joint compound or plaster of Paris to attach it to the ceiling. Keep pressure on the medallion to hold it in place until the mud has set.
Installing a Ceiling Light
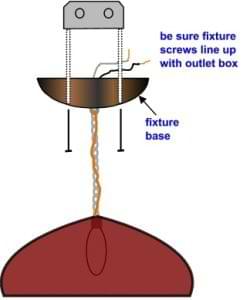
A ceiling fixture may be installed one of two ways: it may have screws that hold the base to the mounting strap on the outlet box to support the weight, or a threaded rod and coupler may be used to suspend the fixture. To install a fixture with screws, locate the base and make sure there are two holes that line up with the screw holes in the mounting strap. Also, check that the screws to be used thread freely into the holes before holding the light up to begin installation.
Hold the fixture up to splice the wires. Usually the first wire splice will aid in supporting a small light but have a helper assist with supporting a large, heavy fixture while making the connections. While still supporting the weight, attach the base to the mounting strap with the screws and tighten the base to the ceiling.
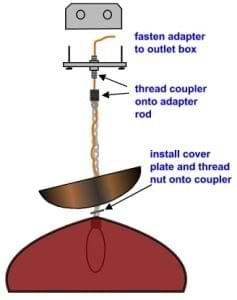
A Coupler Installation
To install a fixture using a coupler, thread the rod into the center hole in the mounting strap and set the rod depth so the fixture base will fit snuggly against the ceiling when it's installed. Measure the depth of the cover plate to estimate placement, precision isn't necessary here, small adjustments can be made to the position after the installation by turning the coupler nut. Be sure all the wires are stripped for splicing, hold the fixture up, and feed them through the threaded rod into the outlet box.
Hold the fixture and splice the wires together, cap them with wire nuts and fold them up into the fixture box. Slide the base plate over the wires and thread the coupler nut onto the threaded rod to push the base plate up and hold it in place. Adjust the position of the base plate by turning the coupler until it's snug against the ceiling.
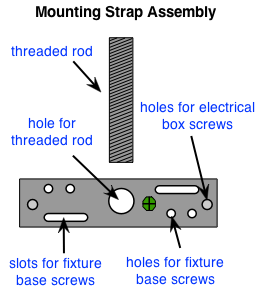
Ceiling Fixture Mounting Strap Kits
A ceiling fixture mounting strap or adapter like the one pictured is available from hardware and home stores to make this type of installation. One of these may be required for light fixtures missing the necessary parts to fit the electrical box. For high ceilings, the threaded rod length can be adjusted to suit most situations.
 Wiring Diagrams for Ceiling Fans
 Finding an Electrical Source
 Measure Circuit Load