How to Run New Electrical Cable
by: Dale Cox
Check permit requirements before beginning electrical work.
How to read these diagrams.
This page offers some options for locating an electrical source for a new wall receptacle or a light fixture, and running the new cable required. To make this job easier, it's best to have a second person at one end or the other of a new run, to sight the end of the fish tape and help guide cable. Also, be sure to always turn off the affected circuits before working on household electricity.
Household wiring in the US is color coded as follows: Black and red are hot, meaning the electricity come through these wires first. The white is the neutral wire, it carries the electricity back to the service panel to complete the circuit. The green, and in the case of NM cable, the bare wire, is the ground. This is a safety wire that carries electricity immediately to ground in case of a short.
When running new wiring pay attention to the amp rating for the circuit you are extending. For a 15 amp circuit use 14 awg (american wire gauge) cable, for 20 amps use 12 awg, 30 amp: 10 awg, 40 amps: 8 awg, 50 to 60 amps: 6 awg. Most lighting and receptacle circuits will be 15 amps and make use of 14/2 or 14/3 but some of these circuits may also be 20 amps, so be sure of the rating and use the proper cable and devices for your project. Depending on the gauge and box depth, there is a limit to the number of wires allowed inside an outlet box. If adding new ones would force exceeding the limit it may be possible to add a junction box to the circuit.
Finding an Electrical Source
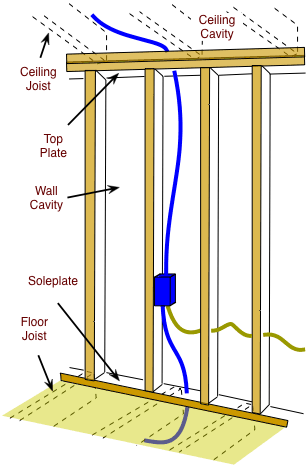
There will probably be several options for an electrical source to serve a new outlet. For instance, it is likely there are several suitable wall receptacles in any given room to extend the circuit to another room or another floor of the house.
When tapping an existing outlet box it will always be OK to extend the circuit from a box with fewer than the maximum wires running to it, as long as the total electrical draw from the other outlets in the circuit don't exceed the ampere rating. To determine the load of the circuit, use the chart and formula for calculating existing load to extend a circuit at this link.
Decide on the location for the new electrical fixture and where the source will be. Determine inside of which walls and ceilings the cable must be run. For example, with a new ceiling fixture using a source from an existing wall receptacle, the cable will have to be run inside the wall cavity, through the top plate, into the ceiling cavity, and on to the new fixture.
Or if you are using a receptacle on an upper floor to serve a new ceiling fixture below, it would have to be run through the soleplate and possibly some flooring, and into the ceiling cavity below. A switch loop will also have to be run from a wall location in the room below, to the new ceiling fixture.
Tap an Adjacent Room
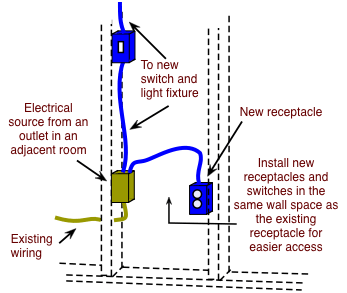
In this example a new wall receptacle can be installed using an existing receptacle in an adjacent room. This can often be the easiest and most likely solution to access a source for a new receptacle or a switch to a new light fixture. Set the new outlet box in the same wall space as the existing one to simplify running the cable.
Tap an Upper Receptacle for a New Ceiling Fixture
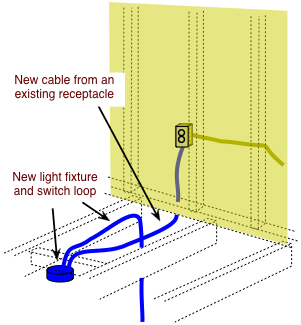
Often a wall receptacle from an upper floor can be used as a source for a new ceiling fixture below but a switch loop must be run to a wall switch in addition to fishing the cable from the source.
How to Bury Armored Cable
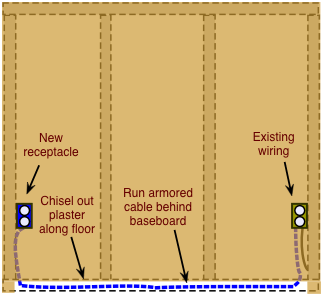
In a room with old plaster of at least ¾inch thickness, an armored cable or greenfield can usually be run under the baseboard by chiseling a channel along the floor wide enough to bury the metal casing flush with the wall surface. The metal will protect the wires from nail punctures with this method but care should be used when nailing baseboards to avoid hitting the wiring.
This method will not work with thinner wall material such as ½inch drywall, at least ¾inch of wall material is needed to bury the metal sheath. For walls less than ¾inch, the studs behind the baseboard can be notched to run a new NM cable and a metal plate used at each stud to protect the wires from punctures.
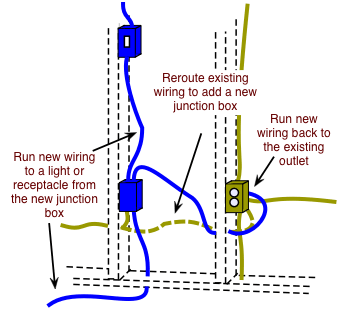
Adding a Junction Box
If you want to use a source with the maximum wires already present, it may be possible to split the source before it enters the box. Cut access to the wiring through the wall material and add a junction box to splice the new outlet into the circuit. Cover the box with a blank plate to protect the splice.
By code the junction box must remain accessible, so look for a spot where the cover plate will blend. Use a 3x2½ inch device box like the ones use for wall outlets and set it at the same level as the existing wall receptacles to minimize visual impact.
Cutting Into the Walls
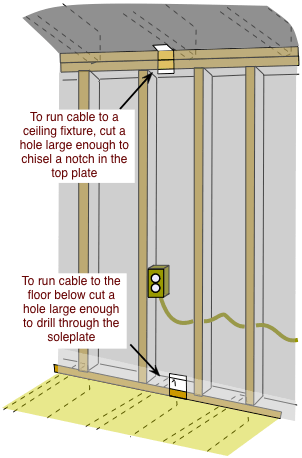
After choosing the electrical source, decide where to cut the walls and ceilings to run the new cable. For example, to run from an existing wall receptacle up to a new ceiling light fixture, a small hole should be cut in the corner where the wall and ceiling meet. The top plate is then notched to pass the cable and afterwards a metal plate is attached over the notch to protect the wires.
At the floor the wallboard is cut to allow for boring a hole in the soleplate. Then the run can be made from an upper floor to the room below or vice versa.
After deciding the route, mark and cut the holes for a new receptacle, switch or fixture using the outlet box as a template. Before installing the new box, use the hole to aid in running the new cable.
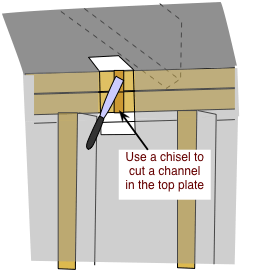
Notching the Top Plate
Mark and cut a hole about 4 inches wide in the wall to expose the top plate and a few inches of the wall cavity. Also, cut a few inches into the ceiling to allow for reaching in to grab the fish tape.
Use a drywall saw and knife to cut drywall and plasterboard, use a reciprocating or keyhole saw to cut wood lath plaster. With the framing exposed, use a small saw to cut two vertical kerfs in the plate about an inch apart and then use a wood chisel to chip out a notch about ½inch or so deep, between the cuts.
After the installation is complete, cover the notch with a metal shield, available in the electrical section of home stores. Repair the wall over the shield and the hole in the ceiling to finish.
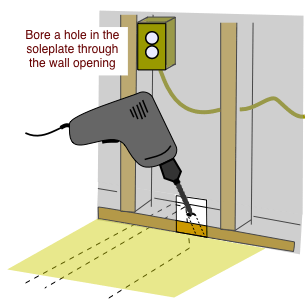
Boring a Soleplate
To make a run to a second floor from an electrical source below, a hole must be drilled through the wall soleplate and any flooring or sheathing present. To bore the holes use a high torque drill and an extension bit 3/4 to 1 inch wide. Keep the hole no closer than 1-1/2 inches from the wood edges and attach a nail guard to the framing members wherever cable passes through it.
Pulling New Cable
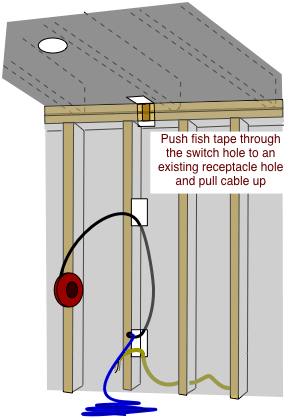
After cutting the access holes, remove the source receptacle and outlet box to free the wires and make room for pulling the new cable. Wrap the ends of the source wires with electrical tape or cap them with wire nuts and bend them out of the way until the new wiring is in place.
To make a run for a ceiling fixture, push an electrician's fish tape through the switch hole and down to the source receptacle. Use electrical tape to strap about 6 inches of cable to the fish tape and pull it up through the switch hole. Cut it free from the fish tape and leave about 12 inches on both ends.
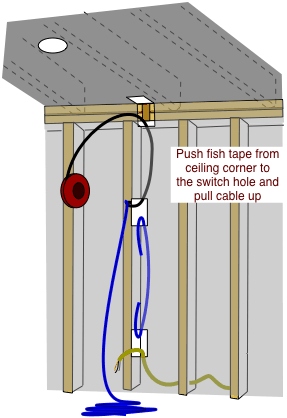
Move to the holes at the ceiling corner and push the fish tape down to the switch hole, tape a new run of cable to it and pull it up and through the corner hole. Cut it free and leave a couple of inches exposed.
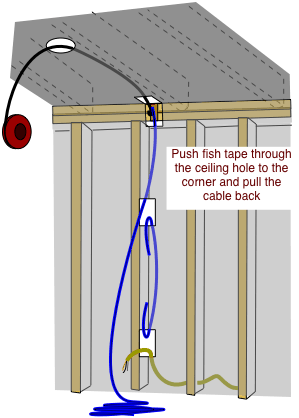
From the fixture hole, push the tape to the corner hole, attach the cable, and pull it through to the new ceiling fixture. Cut the end free and bend it over, cut the other end at the switch hole and leave about 12 inches hanging.
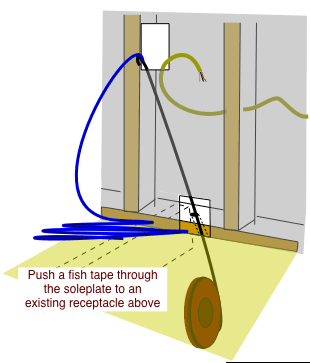
To pull from an upper floor, push the fish tape from the lower room, through the soleplate and to the source. Pull it back through the soleplate and into the ceiling cavity below.
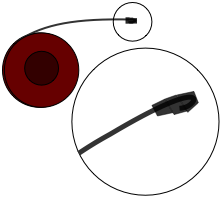
Tips for Fishing Electrical Cable
Tape the hooked end of the fish tape to make it move more easily through wall cavities and avoid snagging on insulation and other obstacles. Push the fish tape from the opening where you want the new outlet, to the location of the source. Remove the tape from the end, attach the new cable to the hook, and pull the cable back the way it came.
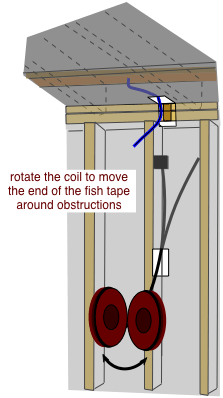
When pushing the fish tape through wall and ceiling cavities it may hit some obstructions along the way. If this happens turn the rolled coil one way or the other while pushing to try and move past the obstruction. Because the fish tape is a rigid, flat wire it is bowed in the direction of the coil, turning the coil will turn the end of the tape in the same direction. This will usually make it possible to divert the tape around framing and pipes.
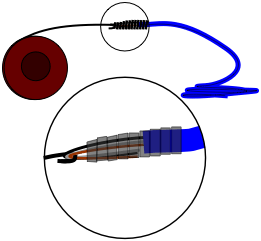
When you have the fish tape through the inner walls, attach about 6 inches of the new cable to the end. Strip off the insulation and bend the individual wires through the hooked end of the tape so they lay as flat as possible and are tapered to a point at the leading edge. Wrap electrician's tape around the wires to strap them down and apply a cable-pulling lubricant to the bundle to make pulling easier.
It can be a tricky process to make all the necessary turns to run new cable. To make things easier try to pull it as straight as possible through holes in wood framing and other tight spots. Have a helper feed it into the opening to avoid dragging and kinks. Also, try cutting more holes, or widen the holes already cut in the wallboard to reach the cable and pull it by hand. Don't pull with excessive force as this will stretch the copper and plastic sheathing weakening the structure and creating a safety hazard.
 Add a New Light Fixture
 Add a New Wall Outlet
 Calculating Circuit Load
 Making a Pigtail Splice