How to Frame a New Window Opening
by: Dale Cox

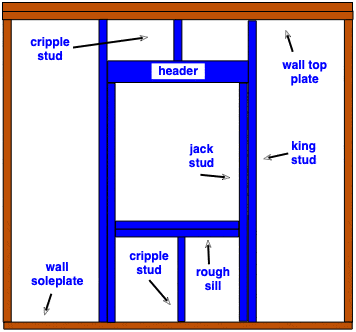
A window frame supports the weight of the wall around the opening using the studs to transfer the load to the foundation. At the top, cripple studs transfer the load from the top plate to the header. Along the sides the king and jack studs support the header and transfer the load to the floor. At the bottom of the opening, two 2x4's are nailed together to form the rough sill which is supported by the bottom cripple studs. The rough sill doesn't support any wall weight but instead anchors the base of the window in place.
#1 - Cut the Old Wall Studs

To build a new window frame in an existing wall, first remove the interior wall covering and any insulation to expose the studs. Decide which studs will have to be cut to install the new frame and which can be kept to use again. Take the jamb size and sill height into consideration when planning the placement. We use a 30 inch sill here but you may want to measure the height of the other windows in your house and set the new one the same. It may be necessary to remove the apron trim to accurately measure the existing sill height.
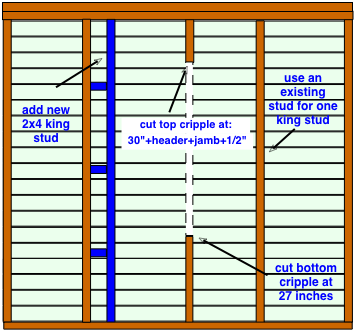
With exterior walls it's best to leave as much of the existing framing in place as possible to preserve the exterior siding. To accomplish this, choose the studs you will use for the king studs and then cut any others that fall in the center to form the top and bottom cripples.
Measure for the top starting at the finished floor: add the header size + the window jamb height + 30 inches for the sill height and ½inch wiggle room. Mark this point on the studs. For the bottom, measure up 27 inches (30 inches for the new window height - 3 inches for the rough sill) and mark the studs there.
Use a square to draw a straight line on both faces and the exposed edge of the studs. Prop 2x4's under the top plate to support the wall load and use a handsaw to cut as straight as possible, all the way to the exterior siding.
Remove the center portion of the old studs and discard them. Most old wood lap siding and sheathing boards will be attached to the studs at each board with one or two nails. This can make it difficult to remove the cutout stud portions. You can usually pry the studs loose at each board but this process can potentially loosen the siding from the rest of the framing. If this is a problem, you can use the method described below to cut the siding and sheathing boards along both sides of the studs and remove everything together.
Newer construction usually consists of plywood sheathing covered with aluminum or vinyl siding. In these cases the plywood will be attached to the studs at random points making it easier to pry them loose. Otherwise, the cutout method can be used to remove the studs.
#2 - Install the Framing

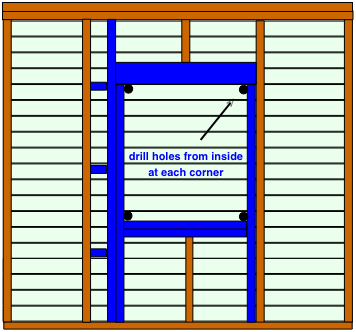
Work out the header size for the opening you're making and subtract the width from the total you used to cut the top cripples above. Cut two new 2x4 jack studs to this length. Build the header and lift it into place while slipping the jacks under to hold it temporarily.
Square up all the pieces, and drive 3" screws to attach the jacks to the king studs. Next drive screws to secure the header to the top cripple and king studs using the toenailing technique here.
Measure between the two jack studs and cut two pieces of 2x4 to this length for the rough sill. Nail the two together and place them between the jacks butted against the bottom cripples. Fasten them in place using toenailing at the sides and up from the bottom cripples.
#3 - Cut Out the Exterior Siding

With all the new framing pieces in place drill a hole at each corner, through the siding to the outside. Use at least a 5/8ths inch bit to make holes large enough for a tape measure and use them to mark the outside wall for cutting the siding.
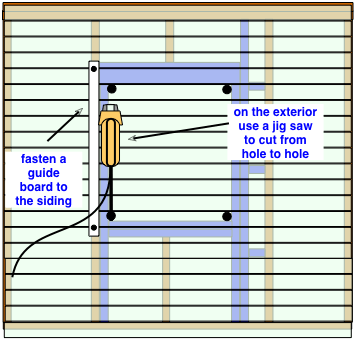
Working from the outside, use a jigsaw to cut out the siding. Measure from each hole and mark the siding at the width of your jig saw baseplate. This is the measurement from the blade to the outer edge of the baseplate. Set a long level on the marks and draw a line for all four sides of the frame. Fasten a straight, 1x3 board to the siding along these lines and use it as a fence to guide the saw blade. Watch where you drive fasteners so they will be covered by the trim molding when your done.
Starting on one side with a new, sharp blade, cut along the lines using the holes as a starting point. Keep the baseplate pressed firmly against the fence and siding while cutting for a clean, accurate cut. Move the wooden fence to cut the other side, top, and bottom of the frame opening and remove the siding. Install the new window jamb as described here.
 Building a Door Frame