How to Build Radiator Covers
by: Dale Cox
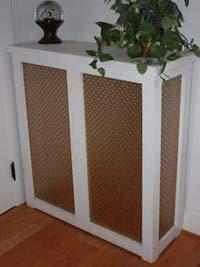
If you're thinking of covering your old, cast iron radiators, you may wonder if it's even a good idea given that they are intended to heat the room. Hot water radiators heat the air around them, which then rises to the ceiling where it is dispersed into the room space. As long as the radiator cover doesn't completely block the flow of air from floor to ceiling, the heat will rise.
Whether the impedance presented by the cover is significant enough to matter to air flow and the resulting heat is debatable given varying circumstances from home to home. Does the appearance or the need for space make radiator covers worth the tradeoff? That's the question and a decision best left to each individual homeowner. Whatever you decide, if you want to cover your cast iron radiators, you can use the method on this page to easily build covers for any size radiator in your house.
Materials
To build a radiator cover like this, you can use stock 1by pine lumber and perforated aluminum sheets from a home store and cut them to size. With a few simple joinery methods, your radiators can be covered with minimal effort and expense.
Stock 1by lumber suitable for this project includes: 1x2's, 1x3's, 1x4's, and in some cases, 1x6's. Each of these is ¾ inch thick and about a half inch smaller than their nominal width. So a 1x2 is actually 1½ inches wide, not 2 inches. Keep these actual widths in mind when doing the project calculations.
Before deciding on the 1by width you will use, take your radiator dimensions and the size of the available perforated screens into consideration. The typical size of perforated aluminum screens is 36-inches X 24-inches. This means for a tall radiator of 3 feet or so, you will want to use the 36 inches for the vertical side. A shorter radiator of a couple feet high will usually be longer in comparison, making the 36 inches better suited for the horizontal length of the front panel.
For a radiator longer than 36 inches or so, more than one screen will be required to cover the front. To support more than one screen, a 1by lumber divider will be required. If you need more than 2 screens to cover the front of the radiator, you will need a divider for each additional one. In some cases, you may even want to add dividers for a more interesting cover design even if they aren't needed to support the screening.
#1 - Measure the Radiator
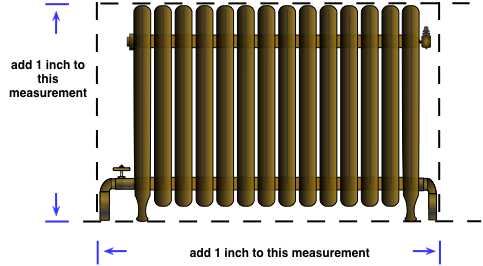
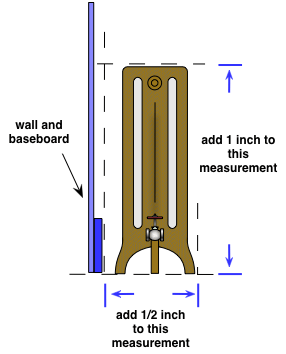
Start by measuring your radiator. Measure the height from the floor to the top of the radiator and then the total lengths of the front and sides. Be sure to measure from the farthest points on the front, this is usually a valve or water pipes going through the floor.
On the side, measure along the floor from the baseboard to the farthest point out, which is usually the radiator foot. Take these three measurements and use the equations in the next section to find the cuts you need to make in the wood pieces.
Before you begin cutting, remember as with all woodworking projects, straight, square ends will make all the difference when joining wood parts. Using a miter saw to make the cuts for stiles and rails in this project will give you the best possible results. Cutting by hand will work too but your skill level will show through and if you don't have a very steady hand, all the parts will not fit well and the final product will show this.
If you don't have a miter saw, try to borrow one or you can rent one at many home stores. If you have an extra $100 or so, you can also buy a small one that will work fine for this and many other woodworking projects.
The accuracy of cutting by hand can also be greatly improved by using a miter box and back saw. These are inexpensive and if done with care, they can provide excellent results with crosscuts and miters. If you don't have a miter saw or the extra money, this can be a good alternative.
#2 - Build the Front Panel
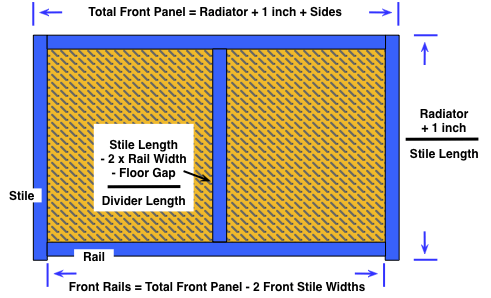
First calculate your Total Front Panel width by adding your front radiator measurement, plus 1 inch for spacing, and the total thickness of the side panels. For a cover with two sides, this thickness would be 2 X ¾ = 1½ inches. The result of this calculation is the total length of the front panel. Working from this total, you can calculate the measurements to cut the panel parts.
Before you begin to construct the wood framing, you will need to determine how much area will require screening. These perforated aluminum screens are usually 36x24 inches. You need to be sure you build the frames so there is an overlap of screen to wood to provide surface area to attach the aluminum. After you have your total panel size, choose your wood width and any divider size to accommodate the screen size you're using, allowing at least a half inch of overlap around all sides.
Front Stiles
To cut the wood for the front panel, look at the diagram above and start with the stiles. Take the height of your radiator and add 1 inch. The extra 1 inch will provide a gap between the cast iron and the top of the finished cover. The total of this calculation is the length of the front stiles.
Front Rails
To cut the rails, take your Total Front Panel measurement and subtract the total width of your 2 front stiles. If you're using 1x3 stiles, this would be 2 X 2½ = 5 inches. So subtracting 5 inches from the front panel length will give you the length of the front rails.
Dividers
If you need to make a cover for a radiator more than 3 feet long, you will have to divide the space up in order to support the multiple aluminum screens that will be required. To cover a longer radiator, it will take at least two screens for the front panel. Plan on cutting one divider for two screens and an additional divider for every extra screen beyond that.
Also, remember to consider the air gap required at the bottom of the cover. A space is required at the bottom to let air enter easily and move up around the radiator toward the ceiling. The space you choose for the bottom can be as small as ½ or ¾ inch up to a couple inches, it's up to you how much space to leave. Keep in mind that a smaller space will give the overall cover a more elegant appearance and help to hide the radiator feet and pipes as well.
To determine divider length, take your front stile length and subtracting the bottom space, plus 2 times the rail width. Again, for 1x3's this would be 5 inches of rail width.
#3 - Build the Side Panels
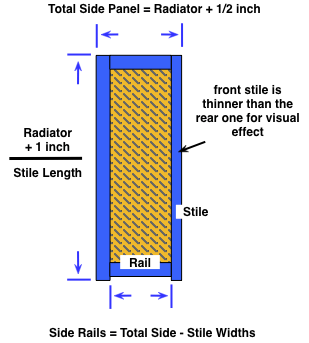
If your radiator is located in a corner of the room, it will probably only require one side panel. Because it won't be visible, the corner side can be left open which will also improve air and heat flow. In any case, the space in the corner will most likely be too small to accommodate a side panel. Keep this in mind when deciding how much screening and wood you will need for a corner radiator.
Side Stiles
The lengths for the side panel stiles are the same as those for the front. However, one side stile should be ¾ inch thinner than the other one. This is due to the way the front panel joins with the sides. The front will add ¾ inch to the side stile it mates with. If you used a 1x3 for both side stiles, the one joining the front will look wider than the other one when viewed from the side. Instead, using a 1x2 for this stile will make a finished total of 2¼ inches which will make it appear the two side stiles are equal.
Side Rails
To get the length for the side rails, add your side radiator measurement plus ½ inch for spacing to get the Total Side Panel width. Subtract from this total the width of the two side stiles. Using the 1x3 and 1x2 stiles in the example above, the total stile width would be 2½ + 1½ = 4 inches.
#4 - Assemble the Parts
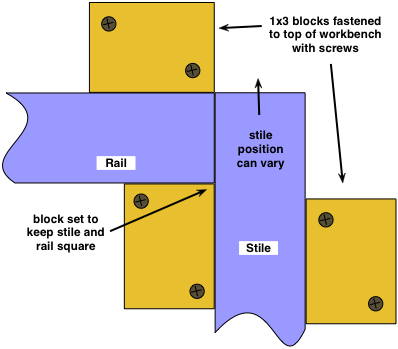
With all the rails, stiles, and any dividers cut, it's time to join the wood parts together. You will need a Forstner drill bit for this. A 3/8" bit will be the best choice for size given the ¾ inch edge width of the 1by lumber.
Lay out the rails and stiles for each panel on a flat surface. Be sure to place the bottom rail so it provides the space you chose for the bottom gap. Use a woodworking square to ensure they form a perfect 90° union and clamp to hold them in place for assembly. You can also use a jig like the one pictured here to hold the parts in place while marking, gluing, fastening, etc.
#5 - Join the Rails and Stiles
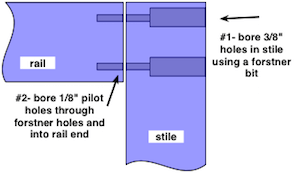
#1
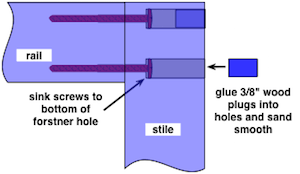
Mark the edge of the stiles at the center point to bore two Forstner holes spaced evenly with each rail. Bore to a depth of about 2/3's the stile width. Using a long 1/8" drill bit, bore a pilot hole at the bottom of the forstner hole, through the remainder of the stile, and into the end of the rail.
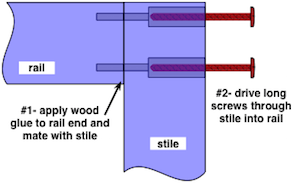
#2
Coat the end of the rail with wood glue and push it into place against the stile. Drive screws into the holes and sink the heads to the bottom of the Forstner hole. Use screws long enough to bite into the rail by an inch or so.
#3
Glue 3/8" wood plugs into the holes to conceal them. Let the glue dry and sand the plugs flush with the wood surface.
#6 - Install the Screens
If you want to paint the cover, it's best to do it before adding the screening unless you plan to paint the screens too. If you want to use a nice hardwood like oak for your covers, you can use a natural finish instead of paint. You will still want to apply the finish before you add the aluminum screens, however. To paint the cover you can use the painting techniques for kitchen cabinets illustrated here if you need help.
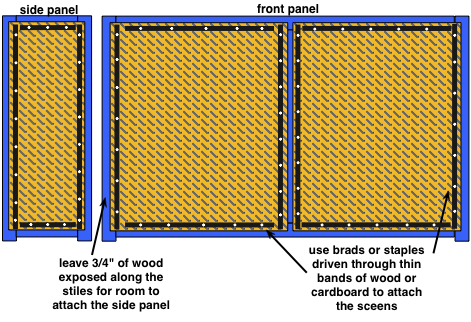
To attach the aluminum screen to the wood, work from the back of the frame and measure the opening. You will need the screen to overlap the back of the wood frame by at least ½ inch on all sides to have space for the fasteners. With the screen in place, use narrow strips of thin wood or stiff cardboard to cover the edges and drive brads or staples through the strips and aluminum, into the 1by framing. Choose 1/2 inch fasteners here so they don't break through the other side of the wood frame.
Be sure to set the screens so at least ¾ inch of open space remains along the outer edge of the front stiles. This is where the side panel will join with the front. These two panels need to join wood to wood for a strong, seamless bond.
If you need to cut the aluminum to size, use a pencil to mark the dimensions with a straight line and then cut the metal with a good quality pair of tin snips. It's best to try and make the wood frame so you don't have to cut the aluminum at all. It can be easy to bend the metal while cutting. A bend or crimp in the metal can create a distracting line where it joins the wood frame, so try to avoid it.
If needed on a long radiator with 2 front screens, you can overlap the aluminum in the center behind the divider. This can help to avoid cutting the metal but don't let the overlap spill into the open space or the visible effect will be distracting from the front.
#7 - Join the Panels
To assemble the cover frame, join the side panels with the front panel. Apply wood glue to the edge of the side stile that makes contact with the front stile. Set the two panels together at a right angle so the side butts against the front. Drive 8d or 10d finishing nails through the front stile and into the side. Sink the nail heads and putty the holes. You may want to touch-up the paint by coating the front surface of the front stile from top to bottom to cover the putty.
A second option for fastening the front panel to the sides is to use forstner holes, screws, and wood plugs as illustrated above in joining the rails and stiles. This can make for a more sturdy radiator cover and you could skip the glue along the edge. Again, the finish will need touching up over the holes.
Install Anchor Blocks
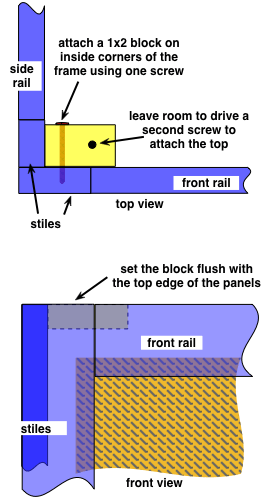
Cut a 1x2 block about 3 inches long and attach it flush with the top in the corners where the two panels meet. Drill an 1/8" pilot hole through the side of the block and just into the front stile. Apply glue to the block where it makes contact with the panels and then drive a screw from the side, halfway into the front stile. Make sure the block presses tightly against both panels and set the screw so it's close to the corner, leaving room on the outer portion of the block for driving a screw later when it comes time to install the top.
Add another 1x2 block to the side at the back of the panel. Glue and screw it in place. This too will be used later to attach the top. If you have space, you can just install a 1x2 to stretch the whole span of the side panel but be sure to check for clearance around the radiator before going this route. In some cases, a pressure valve or other metal parts may be too close to allow for a 1x2 across the whole space.
#8 - Build the Top
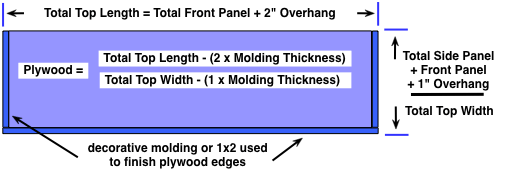
To build the top for the cover, use a piece of furniture grade plywood cut to the dimensions of your finished frame and band the exposed edges using thick molding. Use 5/8th or 3/4 inch plywood for stability and 1 inch plus molding or a piece of 1x2 set on edge for banding to give the impression of a thick, heavy top.
To calculate the top dimensions take the Total Front Panel measurement from above and add 2 inches to provide a good overhang on both sides. Next, take the Total Side Panel measurement, plus the front panel thickness of ¾ inches, plus 1 inch for overhang. These are your total top dimensions. To cut the plywood, subtract from this total length 2 times the thickness of your band molding. To cut the width, subtract 1 time the molding thickness from the total top width.
Furniture grade plywood is usually available in small sizes from home stores. Two by four feet is a commonly available size for B-C grade Maple, Birch, or Oak plywood. If you know the size you want for your top, you can probably have a piece like this cut to size for you at the store.
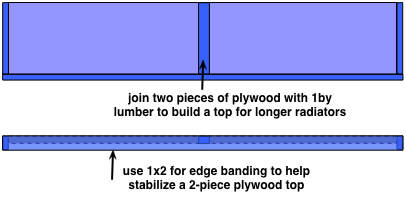
Building a Long Top
If you have a longer radiator to cover, 4 feet of plywood will probably not be long enough. To accommodate the size, you can get a full sheet of B-C plywood and have it ripped to the width you need but that can be rather expensive unless you have several covers to make. Another option is to use a 2x4 foot piece of plywood and join two lengths together to get the total you need.
Using wood glue and 1by lumber, you can assemble a top to any size you need. Start by ripping the 2x4 plywood down the middle to make the two require pieces. Again, you can usually have the store do this for you. Glue the pieces end to end with 1by lumber between. A narrow 1by board will be better than a wider one, so plan on using 1x2 for this divider. Also use 1x2 turned on edge to band the plywood. Use plenty of wood glue to join all the pieces and then nail the banding to the edges using 2" finishing nails. Sink the heads of the nails and fill them with putty before finishing the top with paint.
#9 - Install the Top
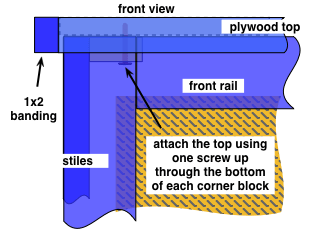
You may want to finish the top, either with paint or stain before installation. Be sure to sand it well where all the parts come together to remove any excess glue. You only need to finish the outer surfaces, so the bottom and inside edges can be left bare.
To attach the top to the cover, use the 1x2 blocks you installed when joining the panels. If you've built a long top using two pieces of plywood, also install a block like this at the center point on the cover front rail. Use a longer piece of 1x2 to span the union in the top and overlap generously on both sides. The longer the 1x2, the more stable the manufactured top will be. You could even use a 1x2 that spans the whole distance from side to side and set multiple screws from the bottom to stabilize the top even more.
 Cabinet Painting Techniques
 Build Folding Sawhorses