Hot to Make Circular Saw Wood Cutting Jigs
by: Dale Cox
Cutting wood with a circular saw requires a steady hand. Carpentry demands perfectly straight, square boards if you hope to produce acceptable results with your woodworking projects, so using a circular saw freehand can present a problem in this endeavor.
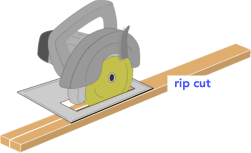
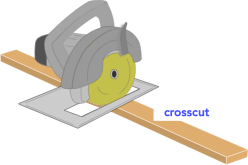
To make truly straight, square cuts with a circular saw you really need to use a fence of some kind to keep the blade steady and on course throughout the stroke. This is especially true when ripping boards. A fence is easy to fashion with clamps and scrap wood but measuring and setting a jig every time you need to cut some boards can be time consuming and you always run the risk of less-than-perfect alignment and unsatisfactory results. Having a pre-made jig to easily snap into place makes it simple to get accurate cuts with a circular saw every time.
This page contains plans for a few simple circular saw jigs that can be easily assembled and kept on hand to make perfectly accurate rip and crosscuts whenever the need arises. These jigs are easy to make with just a couple pieces of plywood and some straight planks.
Making a Crosscut Jig
Crosscutting is simply cutting across the grain of a board. Crosscuts are a constant in construction, trim carpentry, and woodworking projects. Most crosscuts are done with a miter saw but sometimes you'll need a circular saw for crosscuts on plywood and other boards too wide for a miter saw.
To make this crosscut jig more versatile, we chose to use a 4 foot long fence. With this length, it can be used to cut across sheet materials like plywood and masonite as well as for most other boards, both large and small.
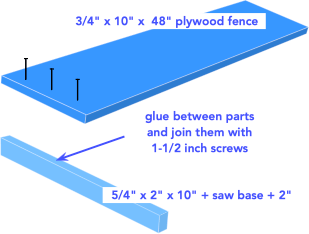
This jig is extremely simple to make and use. It's comprised of a 3/4 inch plywood fence cut to 10" x 48", and a 5/4" x 1-1/2" stop bar. It's critical that the fence be cut perfectly straight and square to ensure an accurate jig. You can buy a 4 x 4 foot piece of 3/4" plywood precut from most home stores and trim it down to the size you need. Be sure to cut along the grain and not across the plywood to maintain the stability of the wood and prevent warping over time.
To make the stop bar you can use a five-quarter pine board from a home store. These are usually available in 3-1/2 or 5-1/2 widths that can be ripped down to the 2 inches needed for this jig or you can opt for a precut 2 x 2 but it may be difficult to find one straight enough for this project. The stop bar should be cut 2 or 3 inches longer than the total fence width plus the width of the circular saw base so there's a bit of overhang that can be trimmed off to preciously match the saw blade on the finished jig.
Join the fence to the stop bar using wood glue and 1-1/2 inch flathead wood screws. Pre-drill and countersink the holes so the screw heads don't protrude. Set the pieces together squarely and drive the screws from the top of fence into the stop bar. Be sure to wipe off any excess glue, especially under the fence where it meets the bar. Let the glue set completely before continuing.
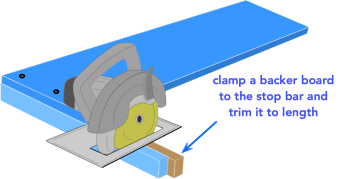
To trim the stop bar, set the jig on a workbench with a scrap piece of 5/4" board pressed to the inside. Use the circular saw to trim the stop bar to length, cutting through it and the scrap wood at the same time. This backing board keeps the saw from tearing the wood on the stop bar which may create a ragged edge that could cause inaccuracies when using the jig.
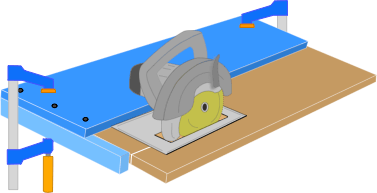
To use the jig, set the board to be cut on a workbench or sawhorses, measure and mark both ends. Set the jig so the fence aligns with the marks and clamp everything together. Clamp both ends of the jig to keep it firmly set throughout the stroke of the saw.
Making a Rip Jig
There are two rip jigs illustrated on this page. The one here will be suitable for ripping boards that are sufficiently wide at about 10 inches or more and the other, covered below, will work for ripping narrow boards down to 1x6's or even 1x4's. In both cases, the design is the same with the only difference being the dimensions of the parts and how the finished jig is used.
A large version of each jig can be made for ripping boards 8 feet long or more, and a smaller, 4 foot one will come in handy for shorter pieces as well as for cutting across 4 foot plywood sheets when the need arises.
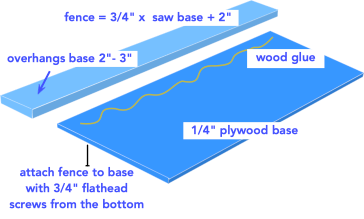
The base for this jig is a piece of 1/4" plywood 10 inches wide and cut from the long side of the sheet. This board will be trimmed down to size on the finished jig but you need to start with an oversized piece. Most home stores will cut plywood for you using their panel saw or you can cut it yourself. Either way, be sure you're working with two perfectly square, straight edges to attach the fence.
You can make the fence for this jig by cutting 3/4" plywood to the proper width or you can use straight, solid wood 1by planks from your lumber supplier. It can be difficult to find planks straight enough for a saw fence, especially at 8 feet long, so cutting your own may be preferable. Either way make sure the fence board is perfectly straight to get good results when using the jig.
The rip fence should be longer than the base by 2 or 3 inches to help guide the saw before the blade engages the wood. Also make sure the fence is wider than the saw motor overhang. Because the motor sticks out past the saw base, it will catch on the clamps holding the jig in place if the fence board is too narrow. For most circular saws, a 1x6 is probably wide enough but measure from the edge of the base to the end of the motor housing on your saw to be sure. Also be aware that at 3/4 inch, the fence board may sit higher than the normal height of the motor housing. When using the jig, you may need to lower the base a bit to elevate the motor for clearance.
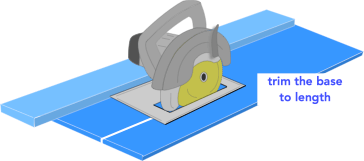
Working from the bottom, attach the base to the fence using wood glue and 3/4" flathead screws placed about every 8 inches. Pre-drill and countersink the holes so the screw heads don't protrude. Wipe off any excess glue and let it set completely before proceeding.
Use the saw to trim the base to length. Be sure to have a sharp carbide or plywood saw blade installed and cut smoothly to get a nice, clean edge along the base.
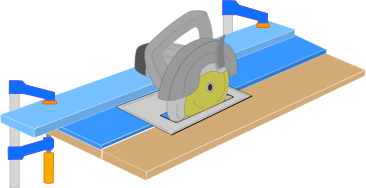
To use the jig, set the board to be ripped on a workbench or sawhorses and mark both ends to the proper width. Set the jig over the board lining the marks up with the edge of the base. Clamp everything down to the support surface being sure the clamp placement doesn't block the passage of the saw motor housing.
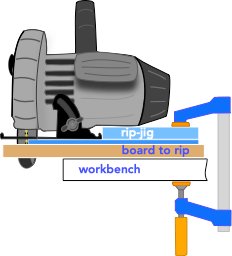
Rip Jig for Narrow Boards
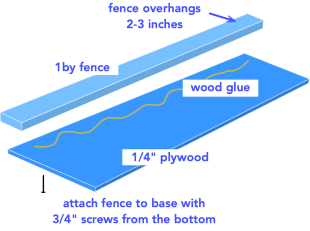
This jig is basically identical to the one above with the exception being which side of the saw base presses against the fence. Here, to enable ripping narrow boards, the saw base edge nearest the blade guides the cut. A 1by plank or 3/4" plywood forms the fence. This board can be rather narrow at 2-1/2 inches so a 1 x 3 will work here. The fence is cut a couple inches longer than the base to guide the saw before it meets the wood.
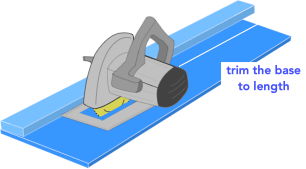
As above, the base is a piece of 1/4" plywood cut perfectly straight and square and attached to the fence board from the bottom using 3/4" flathead screws. Be sure to apply wood glue between the pieces and wipe off any excess before it can dry. Because this is a more narrow jig, you can start with a piece of plywood around 8" wide and trim it down to size on the finished jig.
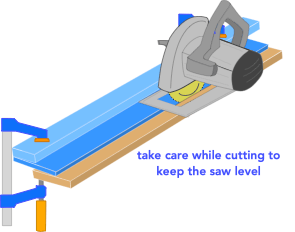
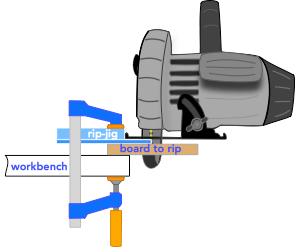
This jig is a little less stable to use than the wider one above. Because the portion of saw base resting on the jig is much smaller, you'll have to pay closer attention to keeping the saw running flat and level along the guide.
To use the jig, set the board to be ripped on a workbench or sawhorses so the blade will clear the support as it makes the cut.
Mark both ends of the board to the proper width and set the jig so the marks line up with the base. Clamp both the jig and the board to the support at both ends. Take care throughout the stroke to ensure the weight of the motor doesn't tilt the saw to that side.
 Carpentry Techniques
 Build Folding Sawhorses