Crown Molding Design Ideas
by: Dale Cox
This page contains profile pictures and dimensions for several stacked crown molding ideas. Some of these are narrow designs suitable for a room with a lower ceiling of about 8 feet. Other, wider designs include traditional crown molding incorporating a cornice suitable for larger rooms with ceilings of 9 or 10 feet plus.
To build these moldings, a backer board is used to anchor them to the wall and ceiling before the other, usually more elaborate, profiles are installed on top. The wider pieces of these designs can be joined at outside corners using a miter joint and at inside corners using a miter or coped joint. Join the small strip pieces with a glued miter rather than a cope on the inside corners for a smoother finished look.
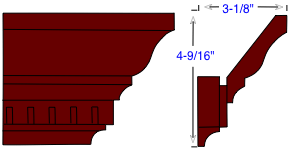
This is a traditional crown design with a cove and dentil profile added along the bottom. A 1x2 is used to push the whole profile out from the wall to make it appear deeper but it could also simply be installed with the dentil molding flat against the wall and the cove eliminated from the design.
To make this installation, fasten the 1by board to the wall framing with 2 or 2½inch nails. Attach the dentil and cove strips to the board and finish by installing the crown between the stacked pieces and the ceiling.
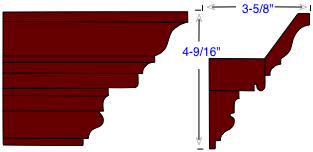
This combination uses a narrower version of the standard 52° crown profile, a piece of beaded brick mould, and a large piece of rake mould to finish the bottom.
Install this one by nailing the rake strip up first before stacking the brick mould on top. As with all the designs on this page, the crown is installed last and supported by the other pieces in the profile.
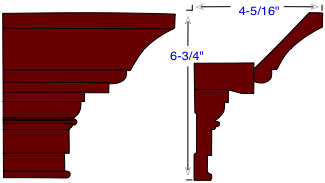
Here a Victorian style door casing is used as the anchor and a beveled brick mould pushes the whole thing out onto the ceiling a bit. A bead and coved crown is used to carry on the rounded theme of the door casing and tie the design together.
Nail the casing to the wall first and then stack the brick mould on top, nailing down into the edge of the casing. The crown can then be nailed to the brick mould and the ceiling.
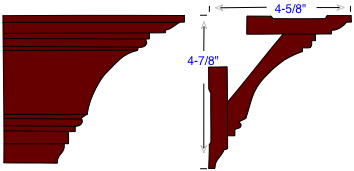
This is a simple design that looks elaborate because of the beads along both sides of the crown profile. Two pieces of baseboard are nailed along the wall and ceiling and the crown is installed between them. Stop bead or door casing would also work for the backer boards here. Install this design by driving the nails into the backers where the crown can cover the holes. This will eliminate the need to fill them with putty before painting.
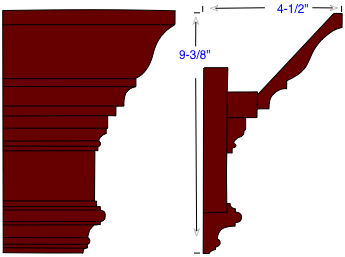
This is an elaborate profile suitable for building a cornice in a large room with a 9 or 10 foot ceiling. A 1x6 is used as a backer in this diagram but wider boards can be used for higher ceilings. Another backer can also be added along the top of this profile to extend it out onto the ceiling in a large room. Here back band and rake mould decorate the 1by board on the wall and a one inch square strip supports the crown.
To install this profile, the backer board is fastened to the wall studs with 2½in nails placed where the other moldings will hide the holes. The back band is wrapped to the edge of the 1by and rake mould is installed along the center. The square piece is butted to the top of the rake and nailed in place. The crown rests against the square strip and the ceiling.
 Build a Wide Crown Cornice
 Building Stacked Moldings