Choosing and Installing Wall Anchors
by: Dale Cox
This page contains pictures, descriptions, and load ratings for the most commonly available wall anchors for drywall, plaster, and masonry, including solid and hollow walls and ceilings. These anchors come in three basic types: sleeve, toggle, and expansion. Use one that will safely support the weight of the object to be suspended.
The load capacities for the wall anchors in these charts are approximate. Be sure anchors are installed correctly and firmly for full benefit. As a general rule, hollow walls like drywall and paneling will hold less weight than solid walls like concrete and some plasters using the same anchor. The type of installation will also have a bearing on load capacity. For instance, a shelf support may tend to pull out on the hanger while a mirror will pull straight down, making a shelf less secure than a mirror of the same weight.
Sleeve Wall Anchors
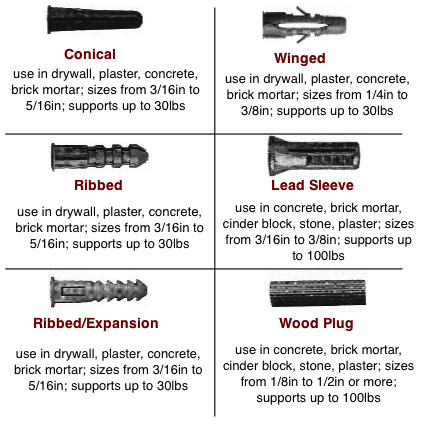
Use these for hanging small shelves, mirrors, and wall art. These can be used in solid and hollow wall materials including: drywall, plaster, and paneling. They are also good for solid materials like concrete and brick.
The anchor is driven into a slightly undersized, pre-drilled hole. As a screw is threaded into the sleeve, it spreads slightly to press against the sides of the hole.
These are intended for light loads up to about 30lb when used in hollow walls, to heavy loads of about 100lb when used in solid masonry walls. These will not hold as much weight in a ceiling and should only be used for very light duty if at all in those cases.
Toggle Wall Anchors
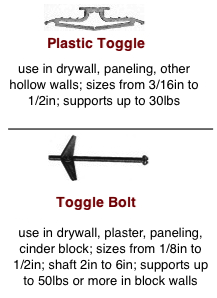
These are used in hollow walls including: drywall, plaster, paneling, and cinder block. These make use of a spring action to expand prongs inside a hollow wall. The prongs are then pressed tightly against the inside of the wall by driving the included screw. A pre-drilled hole large enough to insert the toggle is required.
All mounting hardware must be assembled on the anchor before it is installed in the wall. This can be a major obstacle for heavy wall units requiring several anchors that must be installed simultaneously.
Heavy and light duty toggles are available for mounting loads of about 40 to about 100 pounds. These are the best choice for a plaster or drywall ceiling but they can be pulled through the wall material with too much weight, so use for light loads like plants or lamps but not much more.
Expansion Wall Anchors
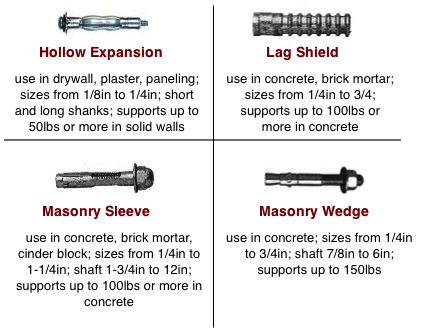
These are available for hollow walls like drywall, paneling, and plaster and for solid materials like concrete, brick, and stone. In hollow walls these are driven into a pre-drilled hole and crimped by turning the included screw. This forces the sides to expand and press against the backside of the wall surface.
Solid wall expansion anchors are used most often for structural support. These are driven into a pre-drilled hole the same size as the casing and for a lag shield, a lag bolt is driven in forcing it to expand and press against the sides of the hole.
Masonry sleeves and wedges are driven into a pre-drilled hole and expanded by turning a nut threaded onto the anchor shaft. For a sleeve, this forces it to crimp and push against the hole. A wedge has a shaft and nut like the sleeve but it also makes use of clips on the end that wedge against the sides of the hole and hold it securely.
Installing an Expansion Anchor
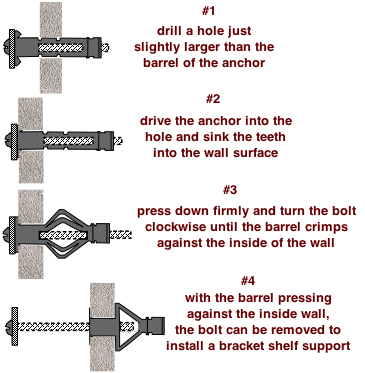
Drill a hole in the wall material large and deep enough to allow the barrel of the anchor to fit snuggly but not so large that the head of the sleeve has no support. Clear debris from the hole and tap the anchor in place using a hammer. Make sure the bolt and barrel are tight against the wall surface and the teeth in the collar are engaged in the wall material to hold it in place.
Use a screwdriver to turn the bolt until the sleeve expands and tightens against the inside of the wall. Push hard against the bolt head as you turn to keep the teeth engage and don't allow the anchor to turn or the teeth will rip through the wall surface and weaken the installation.
Turn until the anchor is good and tight and then remove the screw to install brackets, hangers etc.
Installing a Toggle Anchor
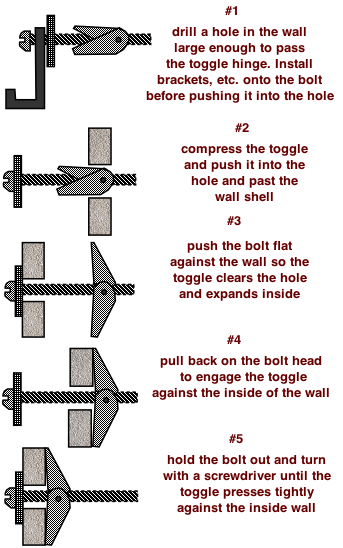
Remove the toggle and install any wall brackets before inserting it into the wall. Drill a hole large enough to pass the toggle hinge. Pinch the toggle arms together and push the whole assembly into the hole pushing on the bolt head completely flat with the wall until the toggle springs open inside.
Pull the bolt back to be sure the toggle has completely opened and has engaged the wall. If you can see the end of a toggle wing coming back out of the hole, push the bolt head back flat again and jiggle it or turn it slightly one way or the other to shake the toggle wing free. Pull back on the bolt again to be sure neither toggle wing is folded back against the bolt. If you can't free the wings inside the wall, remove the bolt and let the toggle fall away and try again with another anchor.
When you're sure the toggle has expanded properly inside the wall, pull out on the bolt again and hold it out while turning with a screwdriver. Keep the toggle engaged against the inside of the wall or it may just spin and not tighten on the threads.
As it tightens the toggle will be held in place. Tighten the bolt until the anchor is firmly set into the wall but don't go too far or it will tear into the wall material and eventually pull through.
 Repair Drywall Paper