Wiring 3 Way and 4 Way Switches with Multiple Lights
by: Dale Cox
Check permit requirements before beginning electrical work.
How to read these diagrams.
The diagrams on this page illustrate connecting multiple lights in 3 way and 4 way switch circuits. Check below for more details about these circuits and some troubleshooting tips.
Wiring a 3 Way Switch with Multiple Lights

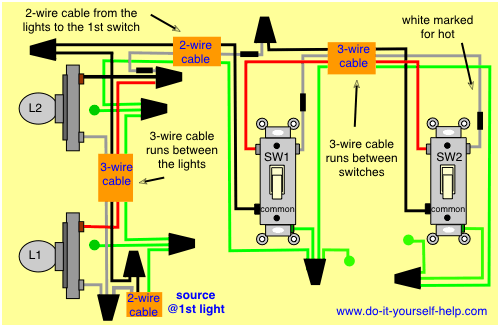
In this circuit, two light fixtures are shown but more can be added by duplicating the wiring arrangement between the fixtures for each additional light. Here the source is at the first switch, SW1, and 3-wire cable runs from there to the first light, L1. Two, 2-wire cables run between each light fixture after that and 3-wire cable runs from the last light to SW2.
At the beginning of the circuit the hot source is connected to the common terminal on SW1. The neutral is spliced to the white cable wire running to the lights and then spliced with a pigtail to the neutral terminal at L1. It is also spliced with the white wire running to the second light, L2. At L2 this white wire connects directly to the neutral terminal on the light fixture. If more lights are added, this wire would be spliced to the fixture and to the white wire running to the next light.
The travelers are run between the lights using the second cable black and white wires and at the last light, they are spliced to continue on to the traveler terminals on SW2. They don't connect to the light fixtures at any point. The white traveler wire is wrapped with black tape to mark it as hot
Wiring 2 Lights and 3 Way Switches

This diagram illustrates another multiple light circuit controlled by 3 way switches. Here the source and the fixtures come before the switches. As with the other diagrams on this page, more lights can be added by duplicating the wiring arrangement between the fixtures.
A 3-wire cable runs from L1 to L2 and 2-wire cable runs from there to the first switch. A 3-wire cable runs between SW1 and SW2. The source hot is spliced to the black wire running between the lights and at the last light it is spliced to the black wire running through to the common on SW1, it does not connect to the light fixtures. The white wire is marked with black tape and spliced to the black wire running to the common terminal on SW2.
Back at the lights the source neutral is connected to the neutral terminal on L1 and spliced with the white wire running to the next fixture. At each light it's connected to the neutral terminal with a pigtail and at the last light, directly to the fixture neutral. At SW1 the red and white wires from the 3-wire cable running between the switches function as the travelers with the white marked for hot using black tape or paint.
Wiring 3 Switches and 2 Lights

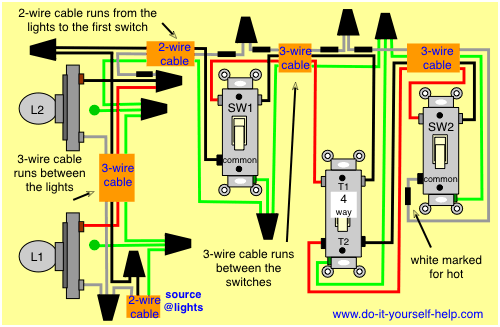
This drawing shows the wiring for multiple lights in a 4 way switch circuit with the source and fixtures coming before the switches. More lights can be added to this circuit by duplicating the wiring shown here for each additional fixture. Here 3-wire cable runs between L1 and L2, 2-wire cable runs from the last light to SW1, and more 3-wire cable runs from SW1 to the 4 way switch and then to SW2.
At the lights the hot source is spliced to the black wire running between lights, it does not connect to the lights. At the last fixture it is spliced to the black wire running to the common on SW1. The neutral from the source is connected to each light fixture with a pigtail and to the neutral running to the next light. At the last light the source neutral is connected directly to the fixture neutral terminal.
The red wire between the lights is connected directly to the hot on L1 and then run to the next light. If there are more than 2 lights, the red is pigtailed to the fixture hot and to the red wire running on to the next light. With 2 lights, it is spliced with the white wire running to the switches. This white wire is wrapped with black tape to mark it as hot.
At SW1 this marked white wire is spliced to the marked white running to the 4 way switch and at the 4 way, it is spliced again to the marked white wire running directly to the common terminal on SW2. This white wire does not connect to the 4 way switch.
The black and red wires running between the switches serve as the travelers for the circuit. At the 4 way the travelers from SW1 connect to the two terminals at T1. The two terminals at T2 connect to the black and red travelers running to SW2.

Here the circuit source is at the first, 3-way switch and 3-wire cable runs between all switches and lights in the circuit. Two cables are run between the lights to provide the addition conductor needed to power them. Here one 3-wire and one 2-wire cable are used to provide the total wires needed but it's also possible to use two, 2-wire cables for this purpose and make one of the white wires a traveler.
Troubleshooting 3 Way and 4 Way Switch Circuits
The most likely cause of circuit failure is an error in the wiring arrangement. Verify the circuit is wired correctly using the following guidelines.
A 4 way switch must be wired between two 3 way switches as shown in the diagrams on this page. A 4 way switch has five terminals: one ground and 4 circuit terminals divided into two matching pairs called travelers. Each pair of traveler terminals should be wired to the traveler wires from one of the 3 way switches in the circuit. The travelers from one 3 way can be wired to either terminal in a pair but don't mix up the pairs on the 4 way or the circuit won't work properly.
In order for a 4 way circuit to work, the 3 way switches must be wired properly at the beginning and end of the path. So be sure that the common terminal on one of the 3 ways is wired to the hot source, and the common on the second 3 way is wired to the the hot terminal on the load.
Check to be sure the traveler wires only connect between the traveler terminals on all the switches. A 4 way switch will only be connected to traveler wires, never to a hot source or load wire and never to a neutral wire. Also, confirm that each pair of travelers on a 4 way are only connected to one switch per pair. Check that the neutral from the source is only connected to the neutral terminal at the load. A neutral wire will never be connected to standard 3 way and 4 way switches, although some smart switches and timers may make use of a neutral wire to operate the device. If you believe your circuit is wired correctly and the lights still don't work, one or more of the switches may be defective. You can test the switches using the procedure described below.
Testing Switches
If you have existing switches that stop working, they may be worn out or the terminal screws may have loosened over time. With the power off and the device removed from the outlet box, check that all connections are still tight using a screwdriver. If the connections are made with clamps instead of screws, tug firmly on the wires to be sure they are all still tight.
If you have an old or new switch you believe was wired correctly and the circuit still doesn't work, the switch may be defective. In these cases, you can test the internal functionality with a simple procedure. Turn off the power and remove the switch from the circuit by disconnecting the wires. Use a continuity tester or multimeter on the Ohms setting to determine if it's conducting electricity properly.
To test a 3 way switch, connect one meter probe to the common terminal and the other to one of the travelers. Flip the switch toggle one way and then the other. If the meter shows continuity with the toggle in one direction and not the other, move the probe from that traveler terminal to the other one and test again. If you find the second traveler shows continuity with the toggle in one direction and not the other, the switch is probably functioning properly. If, however, you don't find any continuity or constant continuity no matter where the probe is or how you flip the toggle, the switch is likely defective and should be replaced.
To test a 4 way switch, connect one probe to one traveler terminal in a pair and the other probe to one traveler terminal in the other pair. Flip the switch toggle and check that you find continuity in one direction but not the other. Move one probe to the other terminal in its pair and test again for the same results. Move the second probe to the other terminal in its pair and test both arrangements again. If you find alternating continuity when you flip the toggle in all possible arrangements, your switch is probably working properly. If you find no continuity or constant continuity in any of the possible arrangements when you flip the toggle, the switch is likely defective. One note about this procedure, if you are dealing with a smart electronic switch or timer, the internal circuitry can not be tested in this way.
 4-Way Switch Wiring
 3-Way Switch Wiring
 Light Switch Wiring
 Ceiling Fan Wiring
 Wiring for Multiple Receptacles
 Wiring a Switched Outlet