How to Paint a House Exterior
by: Dale Cox
This page contains methods and procedures for painting exterior house surfaces including: lap siding, trim moldings, windows, and shutters. Before any finish paint is applied, all exterior surfaces should be clean and in good repair. Check this link for help with preparing for exterior house painting. Also, see here for a video demonstration of how to paint wood siding with a brush.
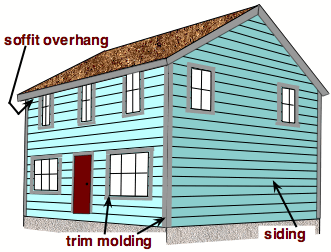
When all the prep and priming is done, it's time to apply the finish paint to the siding and trim. In most cases, you will want to paint the siding on your house first, and then paint the trim. After the siding is dry you can come back and paint windows, shutters, and any corner moldings.
An exception to this would be the case of wide overhangs or soffits. These should be painted first, and then the siding should be done. This will prevent accidental paint splatter on your newly finished surfaces below.
Painting Lap Siding
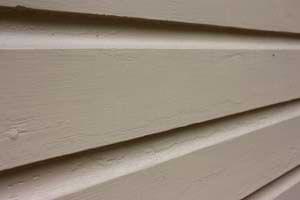
The type of siding you have will determine the painting technique to use. For most houses, some type of horizontal siding will be the case. This can include old lap-type siding where boards are nailed, one overlapping the one below, horizontally across the side of a house.
It can also include new aluminum and vinyl siding that is molded to look like old lap siding. These surfaces are best painted using a brush about 2½ inches wide or more to coat the horizontal runs. This will produce a nice, smooth paint finish if it's done right.
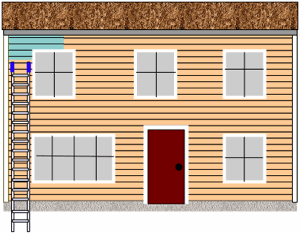
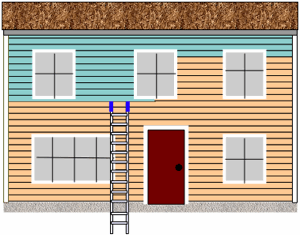
Use an extension ladder with rags or rubber bumpers wrapped over the ends to protect the siding from smudges and scratches. Plan to do 3 or 4 boards at a time and set the ladder just under the last board you intend to paint. Start at the top of the siding and brush from one side of the house, all the way across to the other.
Begin by painting a sharp line between the top lap board and the soffit as far as you can reach. Then coat the lap joints between the remaining boards in the run.
Next, brush the faces of the siding boards and smooth out the paint. Move the ladder across the house to do the next section of lap boards before the paint can dry. Reach as far as you can with the brush on each section to minimize the number of times you have to move the ladder.
Start the next section brushing from the farthest point, back into the first section of wet paint. As before, cut in between the soffit and siding and then paint the lap joints. Finish by brushing the faces of the boards, stroking back into the wet paint of the first section. Work across the house like this, a little at a time, until you reach the next corner to complete the run.
Work quickly when moving the ladder so the paint doesn't dry before you can joint it with the new section. When you've completed the run to the next corner, lower the ladder a little and move back to your starting point. Paint another few boards across the house using the same process. Follow this procedure to paint all the boards on one side of the house, down to the bottom, before moving on to the next side. Check the video here for a demonstration of this process.
Painting Plywood Siding
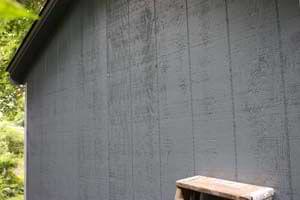
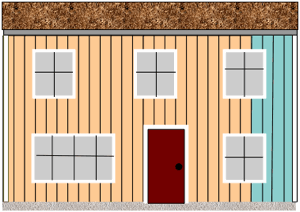
A second, not as common type of house siding is plywood sheeting. Of the plywood manufactured for siding, T1-11 plywood is probably the most common. These are sheets of exterior grade plywood in thicknesses of 3|8th, 1|2, 5|8ths and 3|4 inch. A vertical groove is cut into the surface of the sheet for decorative effect.
This type of siding is usually finished with an opaque stain or sealer but may also be primed and painted with latex or alkyd paint.
Opaque stains seal and protect the wood while adding some color to the finish. These stains are semi-clear so they will also hide smudges and other discoloration on the wood. They come in a variety of colors so you can decorate the siding to complement the paint color on the trim molding.
Stains can sometimes be sprayed on with a compression sprayer if the existing finish is in good condition to start with. If the plywood is bare or the old finish is damaged or degraded, however, the new coating will have to be rolled and brushed on to ensure good penetration.
To paint or stain plywood siding, work on a manageable 3 or 4 foot swath at a time and work from the top to the bottom of the house before moving on to the next swath. Roll the finish coating on with a thick roller and then brush it into the grooves, etc. if necessary to get good coverage. Some oil stains may require wiping with a rag just after rolling or spraying to remove excess coating for a consistent color in the finish.
Painting Exterior Trim
With the siding done, it's time to paint the trim moldings. This includes: the doors, windows, overhangs, shutters, gables, and other architectural features that are usually done in an accent color to compliment the siding color. See these instructions to paint raised-panel doors and check below for steps to painting windows and shutters.
Make sure the siding is completely dry before leaning a ladder against it to do the trim. Use an extension ladder and be sure to pad the ends where it makes contact to prevent damage to the new paint. Start with the highest trim pieces and work your way down the house.
If you didn't coat the soffit overhang first, use a 2½ inch sash brush to paint it now. While you're up there, do any gutters, down spouts, and corner molding that you plan to paint at the same time. Work across the house using the same technique as with painting horizontal siding described above to do the soffit. At the corners, paint the trim molding down to the ground before moving on.
Painting Exterior Windows
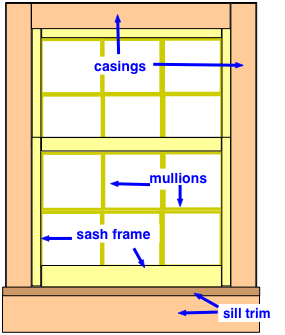
With the overhang done, move down to the next piece of trim, usually second story windows. Paint windows in logical sections. Start at the top, inner most parts and work to the outer, larger parts. For the window pictured here, that would be the mullion molding around the glass in the upper sash first followed by the sash frame. Next, the lower sash should be done in the same order. Finally, the window casing and sill can be done to finish the window.
If you need to remove paint from the window glass, use a single-edged razor blade to scrape it off after the paint has dried. This would also be a good time to wash the window glass with paper towels and glass cleaner. If you wash the glass, be careful not to rub against the new, soft paint.
Painting Shutters
If you're painting window shutters, try to remove them to work and then hang them back up when you're done. If you're working with the shutters off the house, set them on a couple blocks of wood to keep them off the floor.
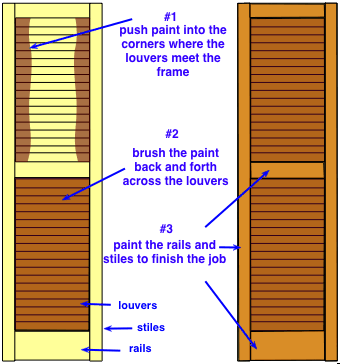
Use a brush to push paint into the joint between the louvers and the shutter frame working from the top. Go from top to bottom of one section of louvers and coat the corners with plenty of paint before going back to catch any dripping or running paint with the brush.
Turn the shutter around if you can and catch any drips running down the other side. If you're painting the other side, coat those louver corners too. With the corners done, go back to the top and brush out the louver slats. Brush back and forth out from each corner to coat each slat.
When all the louvers are done, paint the rails and stiles of the shutter frame. Start with the rails, letting the paint overlap the stiles a bit. Lastly, paint around the edges and face of the stiles to finish the job.