Making Garden Trellises and Supports
by: Dale Cox
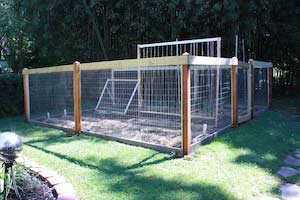
Many garden vegetables will benefit from a temporary support structure to keep them off the ground and encourage healthy growth and fruit production. For example, pole beans will be nearly impossible to grow without a trellis for the vines to cling to. Tomatoes plants which are essentially vines too, need a structure to support them to get the most from the growing season. Other crops that can grow without support like bell peppers, cucumbers, and berries will be healthier and more productive if you provide some kind of structure to keep them off the ground, clean, and protected from strong wind and rain.
You don't need to spend a lot to build trellises and other supports for vegetable plants. Salvaged wood from other projects works great for this purpose. Inexpensive boards like furring strips and 2x3 studs are also a very good option providing an ideal size and shape for garden supports. Other sources for garden stakes and wood support pieces include straight tree branches and bamboo. Aside from wood supports and frames, wire mesh and bailing twine are good, cheap options for constructing structures in the vegetable garden.
Garden Bean Trellis Design
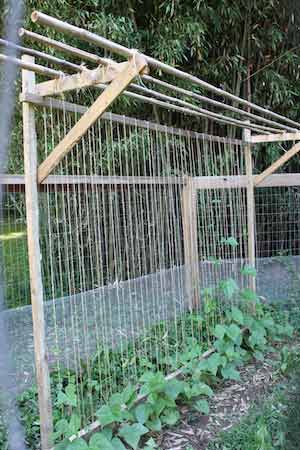
Pole beans can grow upwards of 14 feet or more. Unless you plan to keep a tall ladder handy, you won't want to encourage such extreme growth. A bean trellis like the one pictured here can give the vines more space to grow, while keeping the height you have to reach more reasonable. This design employs 4 wood components, some bailing twine, and a shelf at the top of the structure for supporting bean vines and encouraging them to grow closer to the ground.
To build a trellis like this, use eight foot 2x3's as poles on the two sides and two furring strips for rails to span the space between them, providing a frame for the twine to support and guide the bean vines. At the top, furring strips are used to fashion a shelf which supports 4 small poles running horizontally along the length of the trellis.
Building the Trellis
Sharpen one end of each 2x3, set them aside and lay the furring strips on the ground inline with your bean row. Set the 2x3 poles so they overlap the strips a bit and drive them into the ground a foot or so deep. Use screws to attach the furring strips to the top and bottom of the 2x3's. Set the bottom strip off the ground high enough to allow the ball of twine to pass under it and set the top strip near the top of the poles.
Lace bailing twine between the top and bottom furring strips, starting at a lower corner. Stretch the string from bottom to top, looping it twice around the top furring strip. Move across the trellis, lacing the twine from top to bottom to form a small V pattern with each pass until you reach the other end. Keep the twine taut with each lace and tie it off tight when you reach the other end.
To form a shelf at the top of the trellis, use 4 pieces of furring strip. Cut two a couple feet long and two more a foot or so longer than that. Fasten one short board to one longer board using a single screw on one end. Attach this assembly to the top of each side of the trellis. First, fasten the end of the shorter board to the top of the pole just above the rail using one screw. Fasten the end of the longer board a foot or so farther down the pole using one screw. Using these support arms, lay thin boards or bamboo across the two and tie them in place with some twine. This shelf will provide support for the bean vines as they outgrow the trellis.
Cucumber Frame
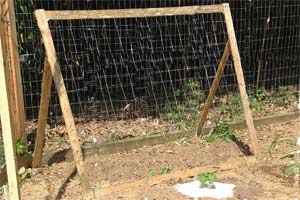
Cucumbers will grow straighter with uniform color and few blemishes if you support the vines with a wire frame. This will also have the added benefit of saving space because the vines don't spread over the whole garden. With a support like this, you can grown tons of cucumbers in a small 5 by 5 foot space. Building this support involves furring strips combined with mesh wire. The frame can be folded for storage and reused each growing season.
Building the Frame
Start by cutting four furring strips to 5ft for the sides, top, and bottom of the frame. Also cut two strips for the rear supports to about 3 feet and drill a hole in the end of each one. The holes are used to stake the frame to the ground for stability. Using 5ft mesh or similar wire, cut a piece 5 feet long to form a square. You'll also need two small hinges to attach the rear support boards to the frame.
Assemble the frame starting with the sides. Lay the wire over each side board so it fits squarely and staple it at every 8 inches or so. Lay the top and bottom boards over the sides at each corner, squeezing the wire between them. Fasten the boards together at each corner so the wire is stretched tightly across the frame.
Drill a half inch hole in the end of each 3 foot support board and attach the hinges to the opposite ends. Turn the wire frame to the back and attach the support board hinges to each side board about 3 feet up from the bottom of the frame. Set the completed frame in the garden where you want to grow your cucumbers and stake the base to the ground using tent spikes. Pull the support boards out at the hinge so the frame leans backward a bit and stake them to the ground through the half inch holes.
Tomato Stakes
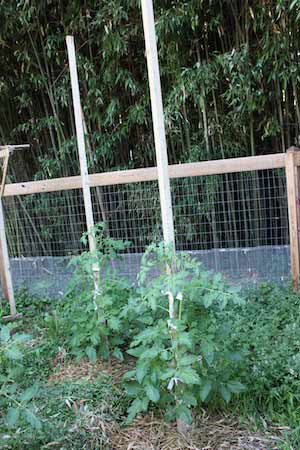
Tomato cages are a common choice for many backyard vegetable gardeners. But these cages tend to be way too small and don't provide adequate growing space for tomato plants, some of which can grow to 12 feet or more. Two-by-three stakes driven into the ground make a much better solution for supporting tomato plants than cages, allowing the plants to reach their full potential and fruit production.
You can buy 8 foot 2x3's at a home store and sharpen one end so you can easily drive them into the ground. Set the stakes 3 feet apart and drive them into the ground a foot or more. Plant each tomato close to a stake so you can tie the vines with strips of cloth as they grow.
If the plant growth exceeds the 7 foot height of the stake, you can attach an extension to the top allowing the plants to grow as high as possible. Furring strips make good extensions because they are light and plenty strong enough to support the tomato vines. Overlap the top of the stake and end of the furring strip by about a foot and fasten the two boards together using a screw at each end of the overlap. As the plants grow higher, you'll need a ladder to continue tying the vines and for picking the tomatoes at the top.
Berry Trellis
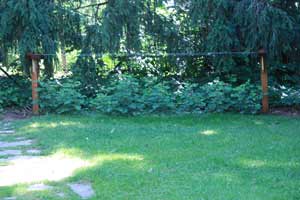
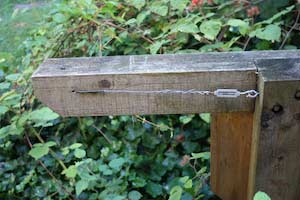
Train berry vines and create a handsome landscaping feature with this trellis design. Two tees form the ends of the trellis and smooth 14 gauge wire is stretched between them to support the berry vines.
An eight foot 4x4 can be cut at 4.5 feet to form a post and a 3.5 foot tee support for the top. The tee is notched in the center to accept the 4x4 post and two bolts hold the two parts together. Short, 1x4 wooden brackets are fitted into a mortise on each side of the post to hold the tee level and square.
Building the Trellis
Dig post holes about 1.5 feet deep on each end of the berry patch and set the tee posts so they face each other. Drill small holes in both ends of the tees to allow the 14 gauge wire to pass through and install screw eyes on both sides of the posts just behind the tee, level with the holes.
At one tee, thread wire through one hole and then through the screw eye, wrapping it several times to tie it off. Pull the wire to the other tee and cut it long enough to go through the opposite hole and reach the screw eye with several inches to spare. Tie the wire to a turnbuckle and hook it onto the screw eye leaving just a very slight slack in the wire to allow for adjustments.
Go back to the first tee and run a second strand of wire from the second screw eye in the same way. Stretch it to the other tee, pass it through the second hole and tie it to another turnbuckle leaving a tiny bit of slack in the wire when it's hooked to the screw eye. Turn both turnbuckles to tighten the wires so they are evenly taut and supporting the berry vines. If the wire becomes loose over time, tighten the turnbuckles to stretch it taut again.
 Building a Backyard Arbor