Building an Interior Wall Frame
by: Dale Cox

Most wall framing is done with 2x4 or 2x6 lumber but it may be possible to use 2x3's to build a new, non-load-bearing, interior wall. By code, 2x3's may be used for this purpose if the wall is no taller than 10 feet and the studs are spaced every 16 inches.
It may be a good choice to use smaller lumber like this if you are only dividing a room to add a closet and you don't plan to have any electrical fixture on the wall. Working with 2x3's is easier and will cost less than larger lumber, and the smaller size takes up less space, which can be important in smaller rooms.
The drawback to using this smaller size comes when installing a door or outlet boxes in the wall. A door jamb will usually be too deep to fit flush into the available space and will stick out on one side or the other. This might not be a problem with a closet where the overhang can be concealed inside but with a room partition, this effect would not be acceptable. In addition, electrical boxes won't fit in a 2x3 wall. When considering the size of the studs to use, it may be best to avoid any such problems by using the larger 2x4's.
A Basic Frame

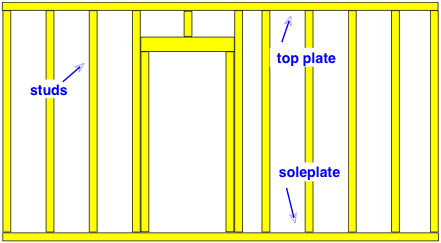
A basic wall frame includes: the soleplate, the top plate, the studs, and in the case of walls that exceed 10 feet in length, fire blocking is required between the studs. Normally one 2x4 is used to form the soleplate, and in the case of load-bearing walls, two 2x4's are stacked to form the top plate. In existing construction, interior walls that are not part of the support system will often have a one-piece top plate. Because a new partition is just a divider and not a load-bearer, it can be built with a one-piece top plate as well.
Stud Spacing

According to the International Residential Code the spacing of the studs in any particular wall will vary depending on whether it is load-bearing or not, its height, and the size of the lumber used. Studs in a non-load-bearing wall may be up to 24 inches apart for 2x4's, and 16 inches for 2x3's.
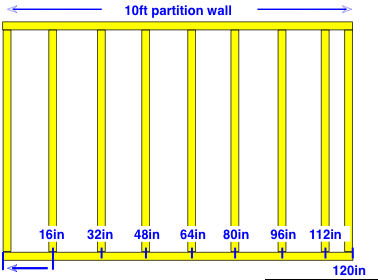
This means that the studs are set 16 inches apart along the two plates, with the center of each stud placed at each 16 inch mark. The required 24 and 16 inch spacing provides the necessary support for the wall and this arrangement makes it convenient to install four foot panels of building materials like drywall, paneling, and plywood.
Adding a Door

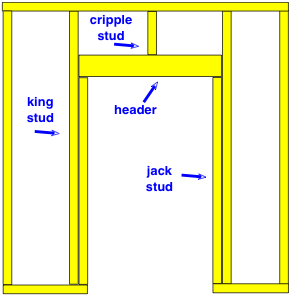
Beyond the basic structure of studs and plates, a door may also be built into an interior wall. A door frame will include king and jack studs to support the sides, and a header and cripple studs to support the weight over the opening.
A frame should be built to accommodate a door with the soleplate in place for stability, the plate can then be cut out after construction is complete. See this link for more about framing for a new door.
#1 - Plan the New Wall
If a new partition wall will be built perpendicular to the ceiling joists, you can choose any placement that suits your purposes. If you must build the new wall parallel with the joists, try to place it aligned with an existing joist so the top plate can be nailed directly to it. Otherwise, parallel placement will require the addition of 2x4 blocking between the existing joists to provide framing to attach the top plate. To install new blocking, access to the joists will be required, which may be difficult in some cases.
Mark the location for the new wall measuring from the existing wall on the other side of the room. Measure from both ends and mark the ceiling where the new top plate will be. Stretch a chalked string between the two marks and snap it to outline the location for the top plate across the ceiling.
Hold a plumb bob on the line at both ends to find the corresponding points on the floor. Mark the floor at these points and snap a chalked string to mark the location for the new soleplate across the floor.
Lumber Requirements
Measure the length for the new wall. Also, measure the height of the ceiling in several places along the length of this space. In most cases the ceiling height will vary slightly along the length of a room. Find the shortest measurement from floor to ceiling and build your new frame to this height.
Determine the number of studs required to build the wall by dividing the length measurement by 16 inches. For a 10 foot wall, 7 interior studs will be needed, plus 2 end studs, for a total of nine. If your ceiling measurement is 8 feet or less, you can use 8 foot lumber for the studs. If the height is over 8 feet, which is more likely, use 10 foot lumber for the studs. Take the wall length measurement to choose boards for the top and soleplate. Two-by-fours are available from 8 feet, to over 20 feet long so choose boards that are a bit longer than the length you need and cut them down to size.
If you're adding a door to the wall, you'll also need to calculate for the king and jack studs, as well as building the header when buying lumber.
#2 - Build the Frame
Cut the top and soleplates to the measured length of the new wall. Take the shortest ceiling measurement, subtract 3 inches for the thickness of the two plates, and cut all the studs to this length. Calculate the placement for any door opening and cut the jack and cripple studs to length. Build the header and have it ready when you layout the rest of the wall framing.
Build the frame with the lumber laying on edge, on the floor next to where it will be erected. Lay the top and soleplates side by side and measure starting from one end. Mark both plates simultaneously, every 16 inches along their length for the studs and mark the location for any door opening using those calculations. Separate the plates and lay the pre-cut studs between them so the centers align with each mark. Nail through the plates into the studs using two 16d nails on each end. Also, lay the pre-assembled header, cripple, and jack studs in place and nail them to the king studs and plates.
#3 - Erect the Wall
At the floor mark, nail a 2by block to the soleplates of the adjacent walls to act as a brace. Or if the floor is unfinished, you can nail a couple of blocks along the chalk line for the soleplate. Use the blocks to hold the bottom of the new frame in place while lifting the top plate to the ceiling. Wedge the structure between the ceiling and floor using a small sledge hammer to tap the plates as needed to draw it up plumb.
Set the new frame plumb and square using a level held against the edge of the studs. Tap the plates one way or the other until they align with the marks and all your studs read plumb by the centering of the bubble in the level. If any point along the new wall frame is not snug because of variances in the ceiling height, use wood shims driven under the soleplate to tighten the fit.
Check to be sure the frame is square at adjacent walls using a framing square and then secure it in place with 16d nails driven through the two plates and into the existing framing. If you don't want to use nails, you can also use 3 inch deck screws driven through the plates and into the joists. Finish the installation by securing the top plate to the ceiling joists or the added 2x4 blocks between the joists. Also, fasten the end studs to the top and soleplates of the adjacent walls using a toenailing technique.
 Building a Door Frame
 Building a Window Frame