DIY Installing a Drywall Ceiling
by: Dale Cox
Ceiling drywall installation is a tough job that will require at least two people to complete. If at all possible the drywall or plaster should be repaired instead to avoid the trouble of installing drywall. If, however, a new ceiling is a must, this page contains some tips for layout, adding furring strips, and supporting the drywall sheets while you're attaching them to the ceiling.
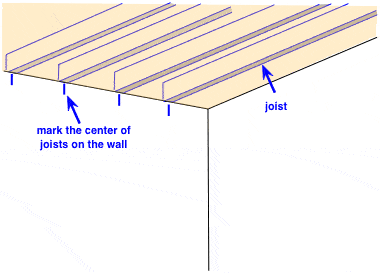
To use furring strips as support for drywall over an existing ceiling, they should be installed perpendicular to the ceiling joints. First determine which way your ceiling joists run. You may need to go into an attic or basement to determine the framing layout. In most cases, all floor and ceiling joists in a house will be aligned in the same direction, so if you can find the floor joist in a basement, you can surmise the direction of your ceiling joists also.
If there's no access to get a visual on the framing, check the flooring. If you have strip wood flooring, it will be running perpendicular to the floor joists. Likewise, if you can determine which are load-bearing walls, they will be running perpendicular to the joists. You may also notice nail pops or cracks in a ceiling which can also indicate the direction of joists. Use clues like these to determine where to expect to find the ceiling joists in a room.
Once you have determined the direction your joists are running, there are a couple methods you can use to locate them behind the ceiling plaster. You can use a stud finder which is easy enough but can be pricey if you don't already have one on hand. Alternately, you can use the tap and listen method to locate wood framing. Start by tapping on the ceiling with the butt of a hammer or other solid instrument. Listen as you tap across the ceiling for a sharp sound indicating a solid wood behind, or a dull sound indicating a hollow space.
Go across the ceiling tapping with the hammer and listening for the different sounds. When you narrow the location, use a drill with an eighth inch bit to bore into the ceiling where you expect to find the joist. If the bit passes easily through missing the framing, continue drilling at one inch intervals in both directions until you meet resistance and wood is ejected from the hole indicating the location of the joist. Measure out 16 inches and check for the next joist with the drill. If none is found, use the tapping and drilling method to find it. Once you've located 2 joists, measure the space between them and use that to calculate the general location of those remaining. Confirm the location of each joist using the drill bit and then mark that point on the walls at each end of the room.
#1 - Mark the Ceiling Joists Locations
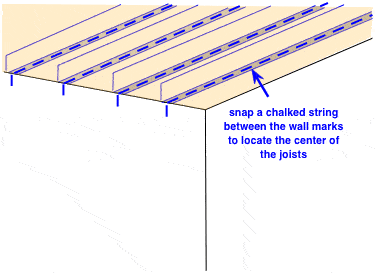
Locate all the joists and mark their center on the wall at both ends of the room. Have a helper on one side of the room and stretch a chalked string tightly between each corresponding wall mark. Hold the string taut while pulling it away from the ceiling slightly. Let go of the string so it snaps back leaving a chalk mark across the entire ceiling indicating the location of the joist.
#2 - Layout the Furring Strips
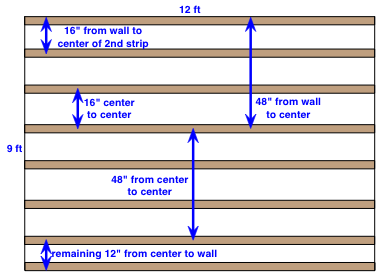
Plan to fasten the first furring strip along one wall and then place the center of the next one 16 inches from the wall. Measuring from the wall, install the remaining strips at 16 inch intervals across the ceiling. Fasten each so the center is right at the 16 inch mark to be sure the 4x8 ft drywall sheets will be supported along each edge. At the end of the ceiling there will be something other than 16 inches left. Here, install the last furring strip butted against the wall like the first one.
#3 - Install the Furring Strips
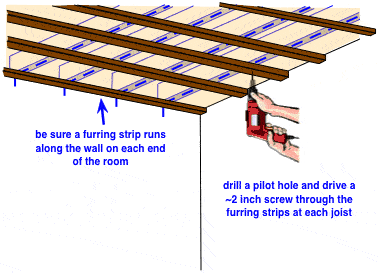
Use 1x2 or 1x3 furring strips placed perpendicular to the joists. Hold them in place and to avoid splitting the board, drill a pilot hole through it and into the joist. Drive 2 inch drywall screws to fasten the strips to the joist. Use longer screws if you're dealing with thick plaster or the 2 inch doesn't engage the joist. Countersink the screw heads to be sure the drywall will lay as flat as possible over the strips. Go across the room and drill and fasten the strips at each joist. If possible, use two drill/drivers to make this part easier.
When all the strips are in place, go along the walls and mark the mid-point of each with a pencil or other non-staining marker. Make the marks far enough down the wall to see them when the drywall is in place.
#4 - Layout the Drywall
Some jurisdictions may require a fire resistant drywall, known as Type X, for ceiling installation so check to be sure you use the right kind of material.
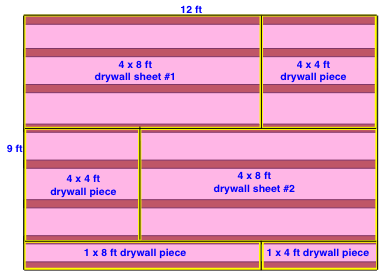
Plan to hang the drywall in full sheets along the corner with the first wall, running parallel with the furring strips. Use as many full sheets as possible to fill out the space butting the opened ends together. At the end of the run, if you need a small piece to finish, cut a full sheet to size and fit it into the last space so the opened end butts to the opened end of the last full sheet.
Run the second row with the first full sheet starting at the opposite end of the room. Hang it so it joins the first row along the finished edges. Run as many full sheets as possible and then cut a small piece to finish out the space butting the ends as before. Staggering the open-end joints like this will make them easier to hide when finishing the seams.
Hang the remaining drywall to finish out the ceiling starting at opposite ends of the run with each new row. At the other side of the room there will likely be a small space left to fill. Cut a full sheet of drywall lengthwise to fill out this space so a finished edge is available to mate with the finished edge of the last full row. Always mate like edges together, don't join a finished edge with an opened edge, it will create a very noticeable bulge in the finished seam.
#5 - Hang the Drywall Sheets
You can use a construction adhesive to help secure the new drywall sheets in place. This is not absolutely necessary and if you decide to do it, use a caulk gun to apply the adhesive along the furring strips just before lifting the drywall into place. Using adhesive will reduce the number of drywall screws needed to secure the sheets and prevent any possible sagging over time.
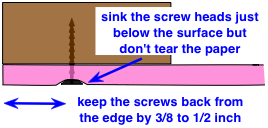
To install the first sheet, lift it into place and push it tightly into the corner and against both wall surfaces. Check to be sure about half the furring strip is showing on the outer edge and hold or support the sheet (see tee support below) while fastening it to the strips with drywall screws. Use a screw gun with a clutch function to uniformly sink the heads just below the drywall surface without tearing the paper covering.
Drive a few screws at the first strip along the wall and then put a few more along the outer edge to hold the sheet temporarily. To drive the remaining screws accurately, use a chalked string to mark the furring strip location along the sheet. Drive the screws along each strip about every 6 inches. Place the end screws back 3/8 to 3/4 inch from the open edge of the drywall.
Support Ceiling Drywall with a Tee
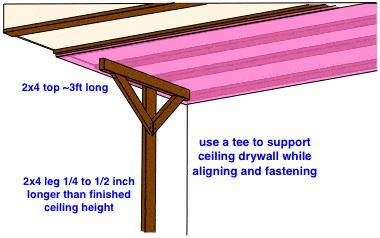
Using a homemade tee for support will make hanging a drywall ceiling much easier. After a sheet of drywall has been lifted into place, wedge the tee under it to support the weight while adjusting the position and driving the screws.
Make the top of the tee about 3 feet long and the leg a bit longer than the new ceiling height. Because this support only needs to hold the weight temporarily, it doesn't have to be perfectly straight up and down. A quarter inch extra length is usually sufficient to get a tight wedge against the drywall but if the height varies more than that, it may be too short in some places. Shifting the tee placement will usually solve this problem but if the variance is extreme, a longer leg will help compensate for larger differences.
 Finish Inside Drywall Corners