How to Build Custom Crown Molding
by: Dale Cox
This page contains steps for building a wide crown molding by stacking several smaller profiles and 1x6 backer boards. The diagram below offers one idea for creating an elaborate crown and cornice profile suitable for a room with a 9ft or 10ft ceiling. The size of this profile can be widened for higher ceilings by using wider backer boards and larger beads.
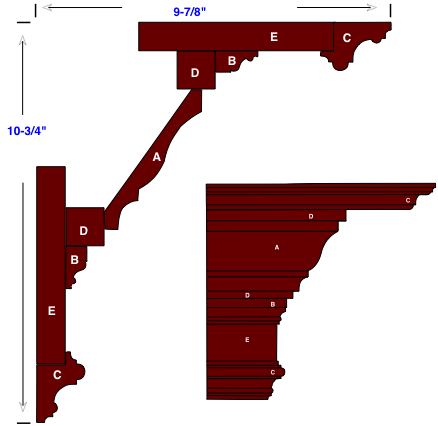
The components that makeup the stacked crown in this diagram include:
- A-a one-piece crown profile, there are lots of choices for this part that can give the profile a much different look.
- B and C-small accent moldings like base cap and back band to finish edges and transition between parts.
- D-thick pieces like brick mould add some dimension and make the profile more interesting and dynamic. Use a thicker piece here for larger rooms to add more depth.
- E-a backer board serves as a foundation for many stacked moldings. The width can vary using pre-cut profiles or finish lumber with small accent pieces finishing the edge.
Joining the Molding
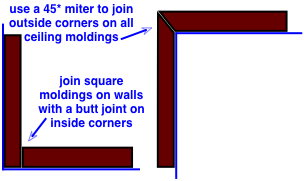
On the walls, join square backer boards using an overlapping butt joint on inside corners and miters on outside corners. On the ceiling, miters can be used to join the backers and all the other pieces as well.
If you're using a shaped baseboard or other one-piece molding as a backer board, they can be joined with a glued miter or a coping technique on the walls. The other moldings in the profile can be treated in the same way, gluing the joints together at the inside corners. On the ceiling, join all the pieces with miters on both inside and outside corners.
Attach the trim to the walls and ceiling using 2½inch finishing nails driven at the studs and joists. Sink the heads to just below the wood surface using a nail sink or, to make installation easier, use a pneumatic nail gun to attach the molding and set the nails automatically.
Installing the Backer Boards
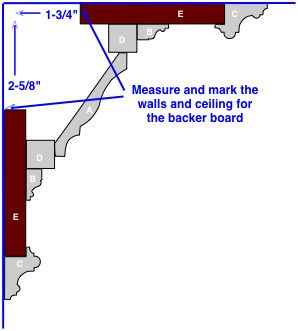
The first step to installing this crown profile is to locate the studs and joists behind the wall surface so the trim can be nailed to the framing.
Begin by measuring down from the ceiling to mark the location for the top of the backer board, piece E. In this example that would be 2-5/8 inches. Mark the wall with a pencil at this point over each wall stud.
Mark the location of the other backer board on the ceiling measuring out from the walls and onto the ceiling. For this project, the measurement is 1-3/4 inches. Mark this point at several places along the ceiling to guide placement of the second backer board E. Also, locate the ceiling joists and mark their location close to the wall where they will remain visible during installation. Install the wall backers first and the ceiling boards second, fastening them to the framing on each.
Installing the Dimension Moldings
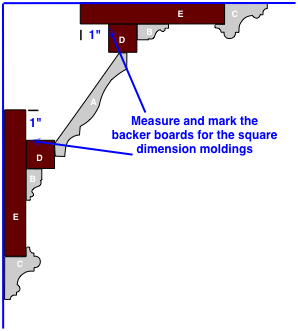
Measure from the inner edge on the backer board and mark the position for the square piece of dimension molding, part D. For this project that would be 1 inch on both boards.
Caulk the edge of D where it contacts the backer just before installation and nail it in place using 2½inch nails. Set the nails so the crown molding will cover the holes to reduce the work needed to finish them with putty. Clean off any excess caulk that oozes out from between the pieces with a clean wet rag.
Installing the One-Piece Crown
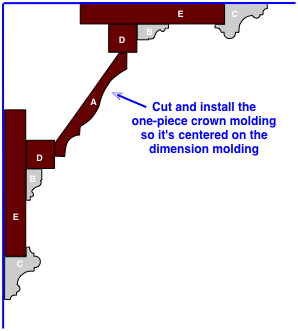
Cut the crown using either the coping, or compound miter methods. If you feel comfortable coping a molding joint, that can be the best way to get a seamless fit. But if you're using MDF molding, coping inside corners is impossible and you'll have to use miters instead.
Apply a bead of caulk along each contacting edge of the crown and nail it in place at the top and bottom with finishing nails about 1½inches long. Space the nails every 18 to 24 inches and sink the heads just below the surface of the wood. Wipe off any oozing caulk with a clean, wet rag before it can set.
Installing the Accent Trim
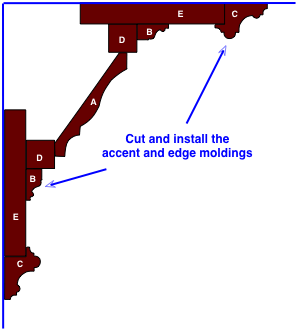
To finish this profile, cut the accent moldings to fit along the outer edges and the joints between the other pieces. With these small moldings a glued miter can be used at the inside corners instead of a coped joint. Because these pieces are so small it can be difficult to cut a clean cope and their smaller size makes it easier to get a smooth, permanent union using a miter rather than a coped joint.
 Building Stacked Moldings