Wiring Diagrams for Household Doorbells
by: Dale Cox
Check permit requirements before beginning electrical work.
How to read these diagrams.
If you're putting in a new hardwired doorbell or you need to repair an existing one, the diagrams on this page illustrate the most common installations you will find. Included are wiring for a typical hardwired doorbell with a transformer, a two-button doorbell, an old house doorbell powered by a battery, and an alternate to battery power using an ac adapter.
Doorbell Transformer Wiring Diagram

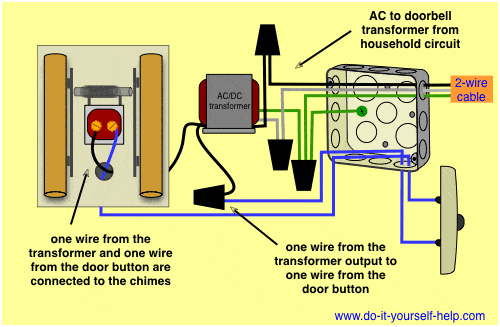
A hardwired doorbell includes a small transformer that converts the household alternating current (AC), to direct current (DC) for the doorbell chimes. A small, 16 awg wire runs from the door button to the chimes. When pressed, the button will send the transformer output through the chimes, sounding the bell until it is released.
The transformer will usually be tucked into the outlet box where the doorbell housing is mounted. It is hardwired to a 120 volt circuit cable run to the outlet box. Connect the black wire from the source circuit to the black input wire on the transformer. Connect the source neutral to the white wire on the transformer and the source ground to the green wire on the transformer.
There will be two wires from the transformer output. Connect one of these to the chime in the doorbell housing and the other to one of the wires from the door button. Connect the other wire from the button to the other contact on the chime in the housing.
Wiring Diagram for a Two Chime Doorbell

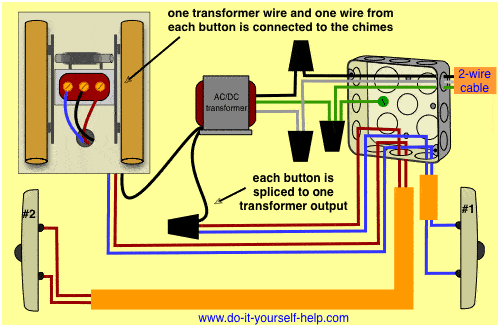
Wiring for two doors is the same as for one with the transformer hardwired to the 120 volt source from a house circuit. Connect the input wires on the transformer to the source circuit using the black to black, white to white, and ground to green method.
A doorbell circuit for two or more doors will have a separate contact on the chimes for each door button included. Connect one wire from each button to one of the chime contacts. Connect the second wire from each button to one of the output wires on the transformer. Connected the other output wire on the transformer to a contact on the chimes.
Old House Doorbell Wiring Diagram

It's not unusual for an old house to have an old doorbell lurking about somewhere that hasn't worked in years. Fortunately, it's likely a simple matter to get things back in working order. As illustrated in the above diagram, the parts of an old doorbell circuit include: the bell, a button mounted at the door, and a battery somewhere in between the two.
The battery is the weakest link here and should be the first place to look for trouble. The battery can be replaced with a large flashlight-type dry cell rated at 12 to 16 volts and if the wires are still intact and the contacts clean, the doorbell should come back to life.
Connect the positive output from the battery to one of the terminals in the doorbell housing. Connect the negative battery output to one of the wires coming from the door button. Connect the other wire from the button to the second contact in the bell housing.
Old Doorbell Wiring with AC Adapter

Another, more permanent repair for an old doorbell circuit is to use a small ac adapter in place of the battery. Most people will have an AC adapter left after an old answering machine or similar device has long since died. Look for an DC output of 10 to 16 volts printed on the side of the adapter casing. Current ratings will typically be very low from these adapters, around 500mA, making them perfect to power the doorbell circuit. All that is needed is a conveniently located receptacle to plug the adapter into. Avoid an adapter with more than about 500mA, too much current will overpower the bell circuit.
To connect the doorbell take one wire from the adapter and splice it with a wire running to the input contact in the bell housing. Splice the second adapter wire with one of the wires from the door button. The second button wire should already be connected to the other contact in the bell housing. If not, make that connection.
Installing a New Doorbell
If you're installing a new doorbell, a remote controlled device makes for the simplest installation and doesn't require any of the circuitry illustrated on this page. All that's required is to mount the button near an exterior door and the chimes in a convenient, central location inside the house. No need to run wires or splice into household circuits, fresh batteries are all that's required.
Repairing a Doorbell
Repairing a faulty doorbell is fairly simple due to the limit number of complex parts involved. If a doorbell doesn't work, cleaning the contacts on the button is usually the answer. Beyond that, a loose wire or malfunctioning transformer will usually be the cause of doorbell failure.
On old house doorbells, the battery is the most likely source of failure. The battery can be replaced, or as illustrated here, an AC adapter can be used to replace the battery.
 Wiring to Add a New Light
 Wiring for Two Outlets in One Box
 Wiring to Add a New Receptacle
 Wiring a GFCI Combo Switch
 Control a Receptacle With a Switch
 Replacing a Switch